Reverse Engineering

This post is an introduction to developing configuration extractors for dotnet malware. The sample used here is RevengeRat, this rat typically employs minimal obfuscation and presents an ideal introduction for config extraction.
The sample has config which can be obtained via strings. However, it is far more interesting and useful to obtain the same values by enumerating IL instructions present inside the code. This allows the analyst to hone in on particular string values and eventually build more advanced configuration extractors.
The two primary samples I will be using are
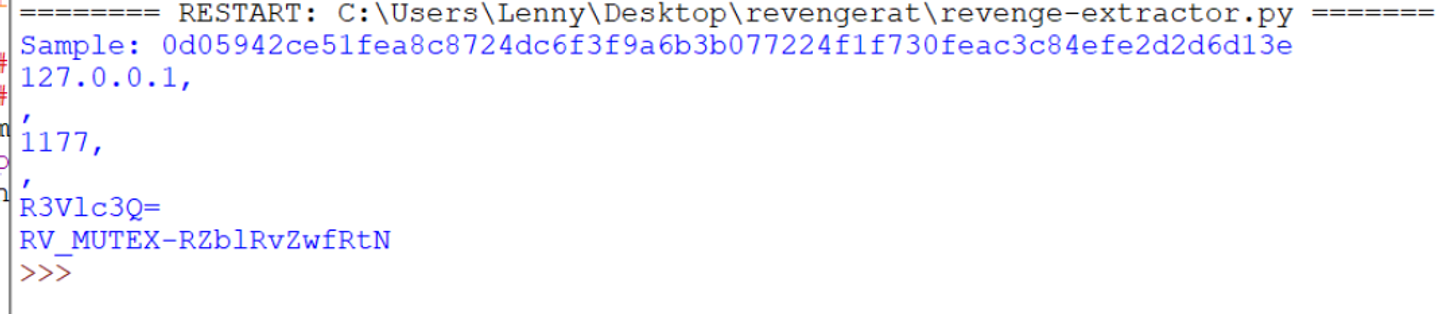
Initial Sample Link: 0d05942ce51fea8c8724dc6f3f9a6b3b077224f1f730feac3c84efe2d2d6d13e
Obfuscated Sample Link: dd203194d0ea8460ac3173e861737a77fa684e5334503867e91a70acc7f73195
Overview
First Step - Manually Locating the Configuration
To build a automated configuration extractor, we first need to be able to locate the configuration manually. For .NET based malware, this means opening up the file in Dnspy and attempting to locate configuration values or functions. .
For .NET malware, the entry point is a good place to start looking. This is because configuration is generally resolved early in the malware execution.
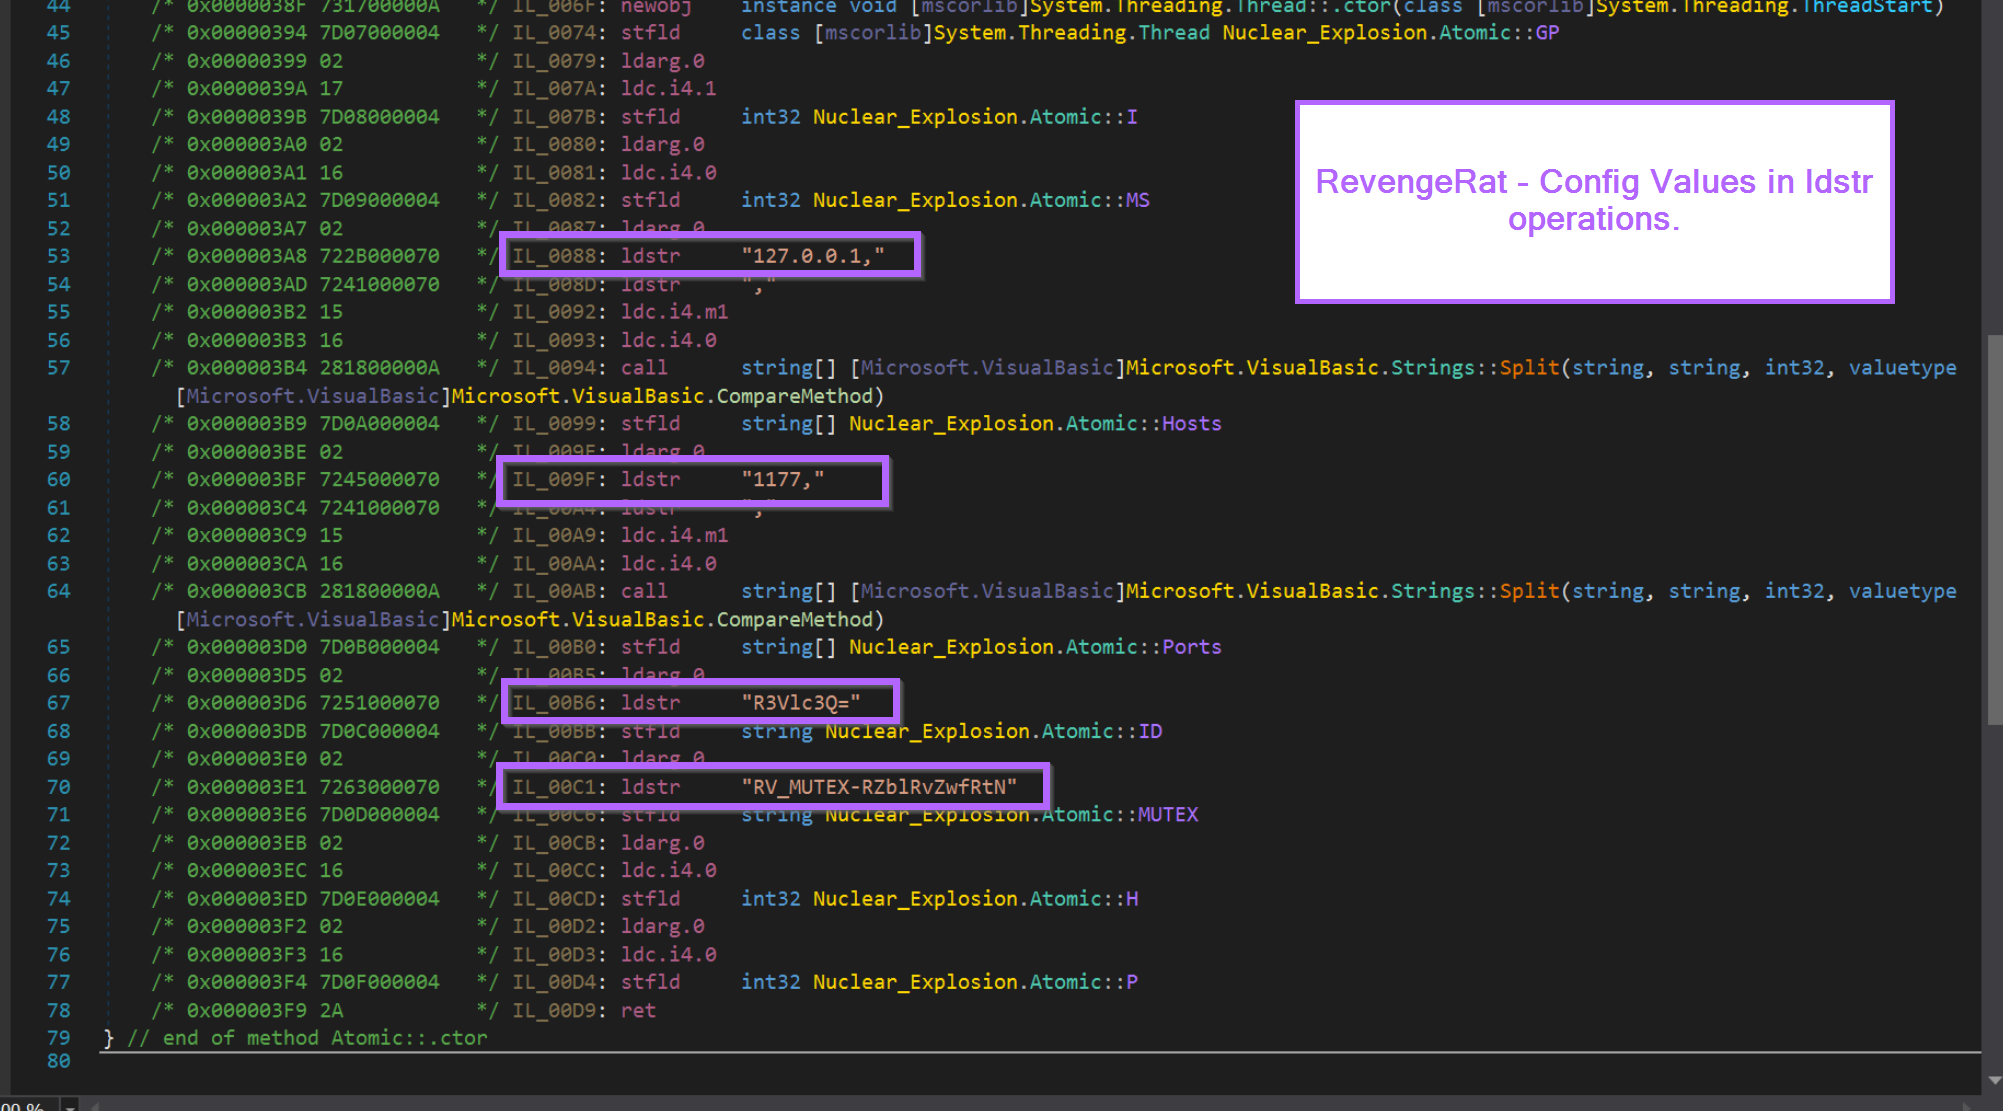
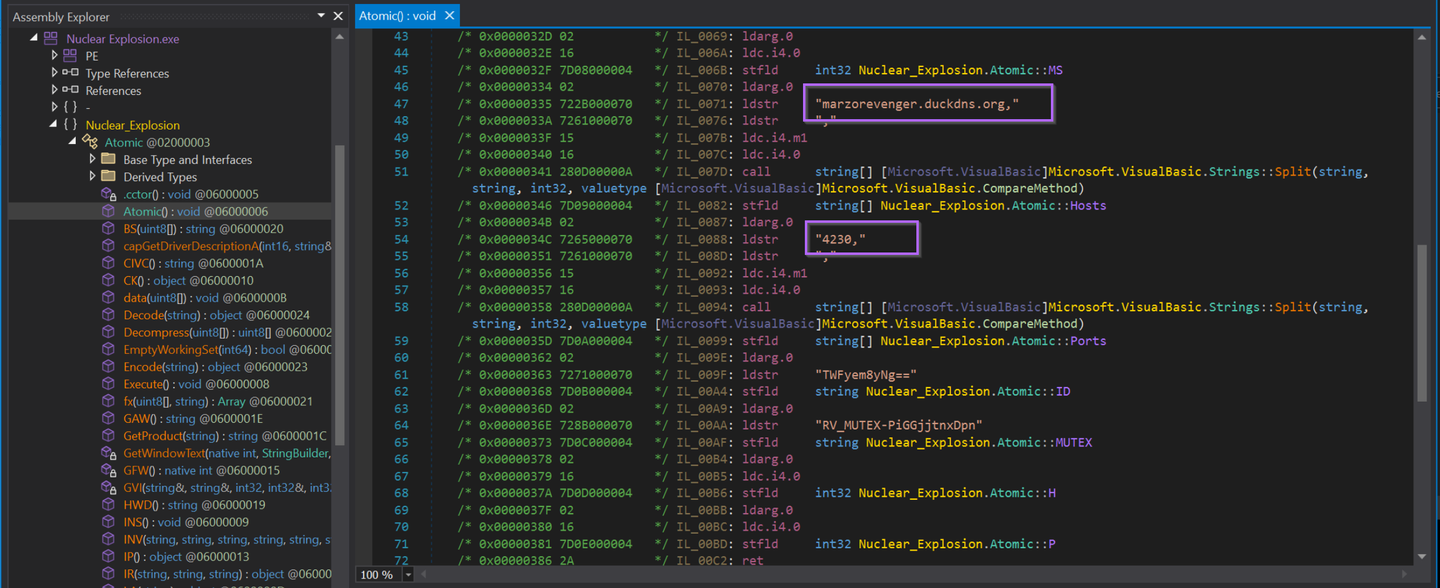
For this sample, the Entry Point is the Main function. Lucky for us, the config values are directly above the entry point inside of Atomic().
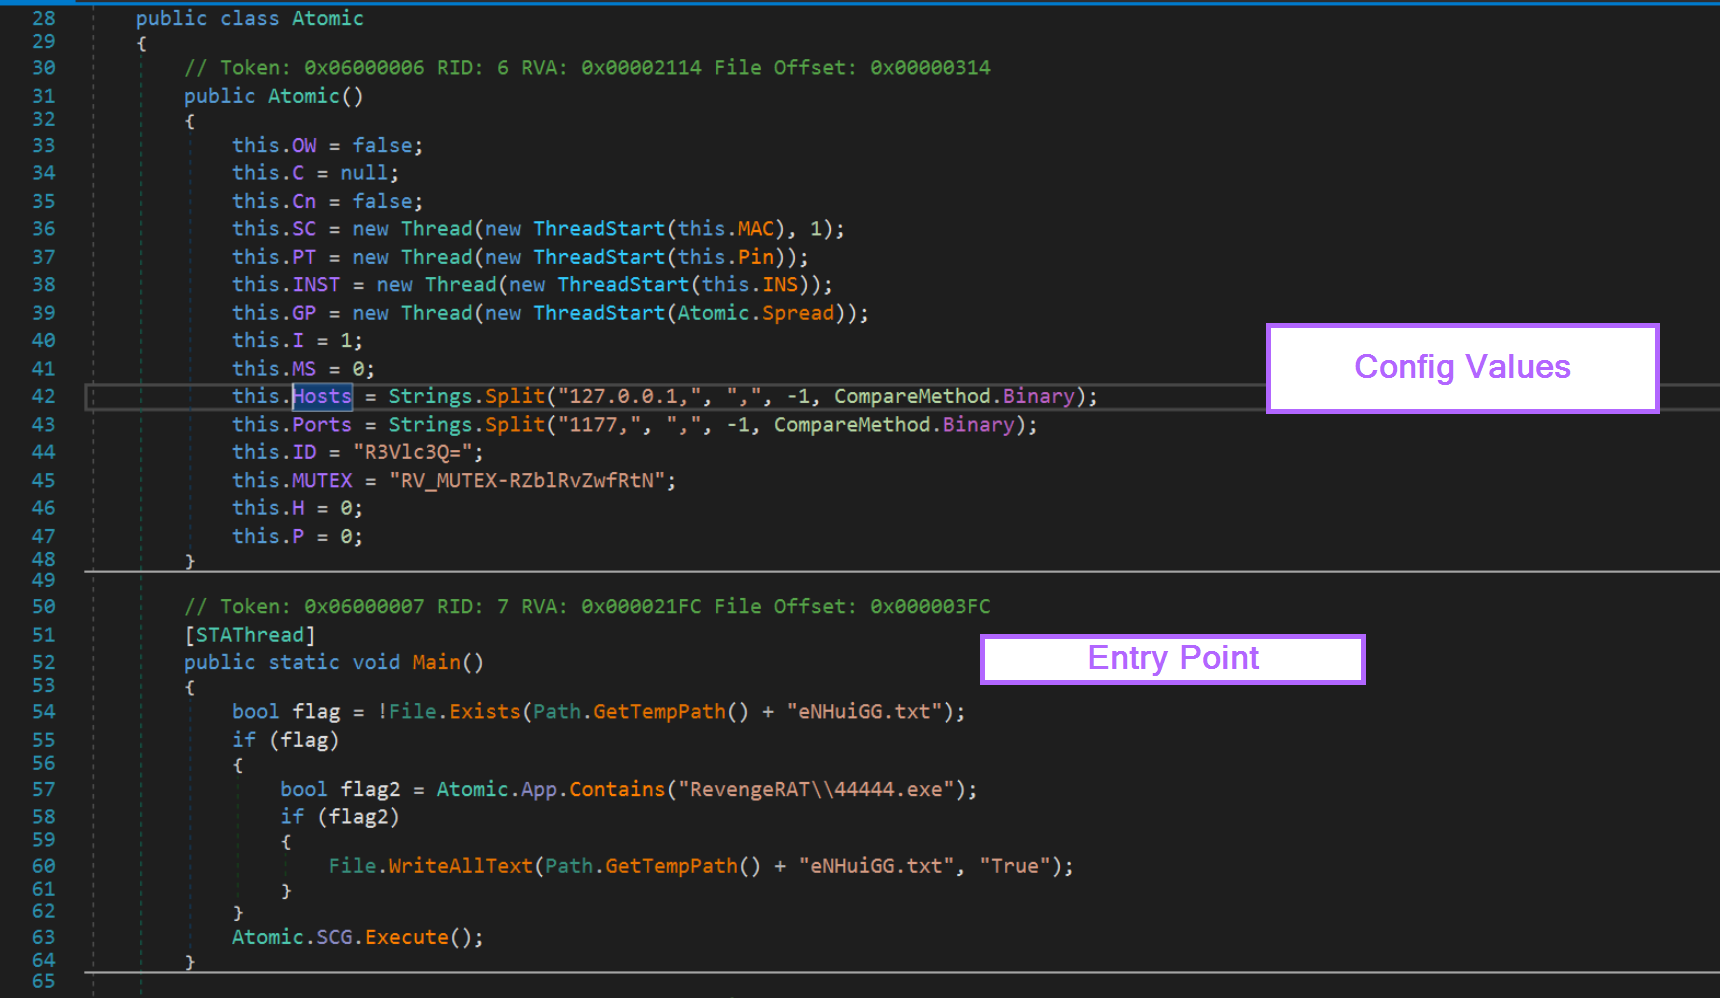
This is a rare case where the configuration is already in plaintext and is extremely simple to find. Since it is extremely simple to find, it's also extremely simple to write an extractor.
For this sample, you could just run strings and you would obtain the same values, but the point of this post is to do the entire process via scripting. This will build foundational skills that are essential for building extractors for more complex malware.

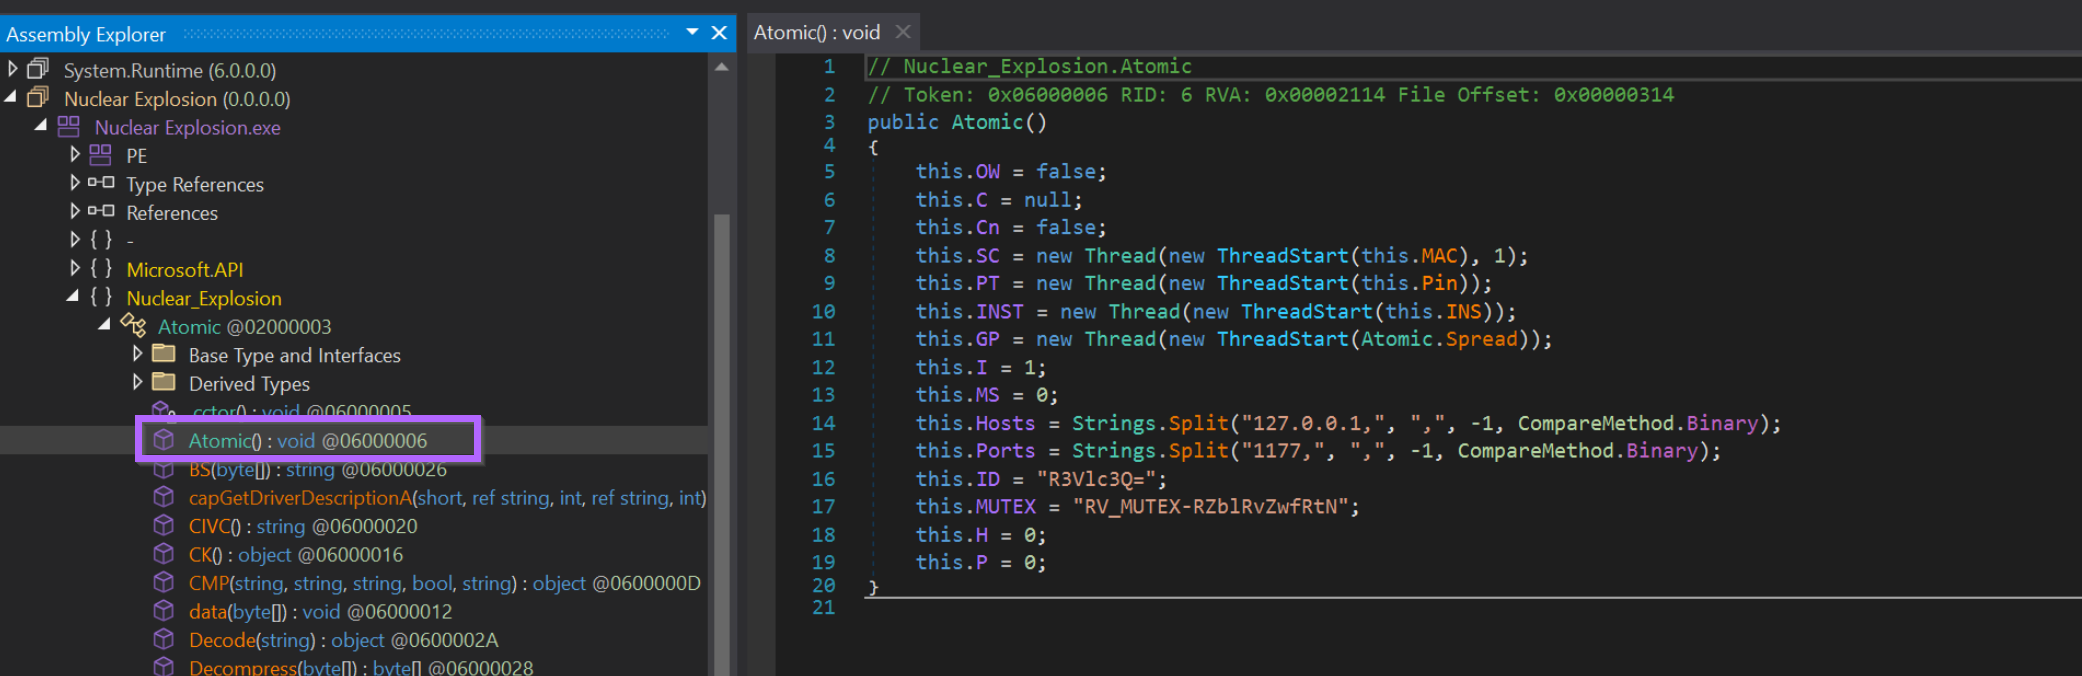
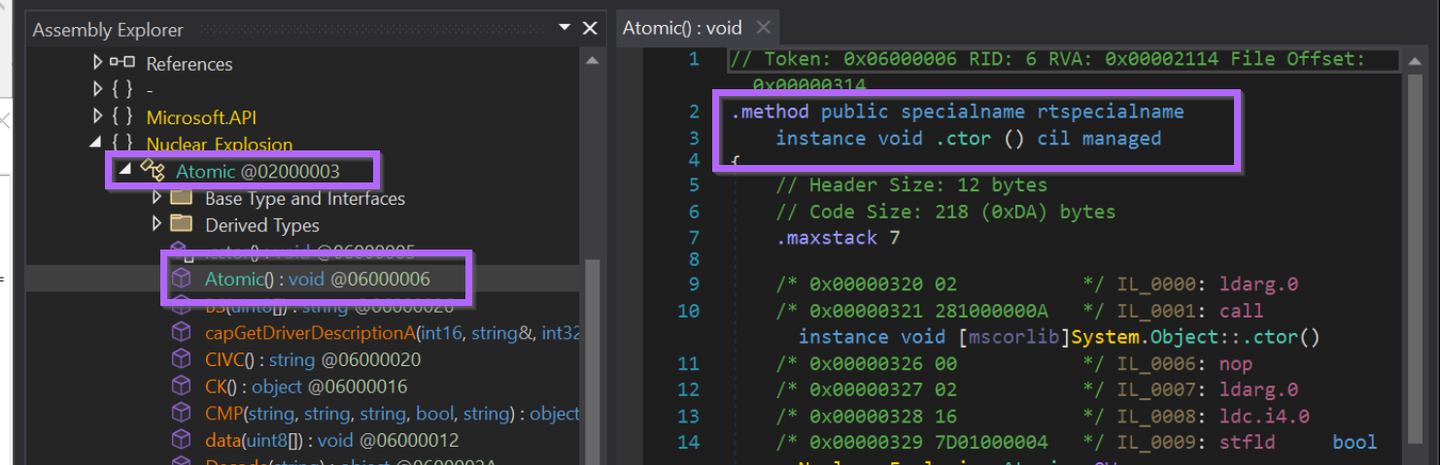
Now that the config has been found, we want to hone in deeper on the Atomic() method that contains the config values.
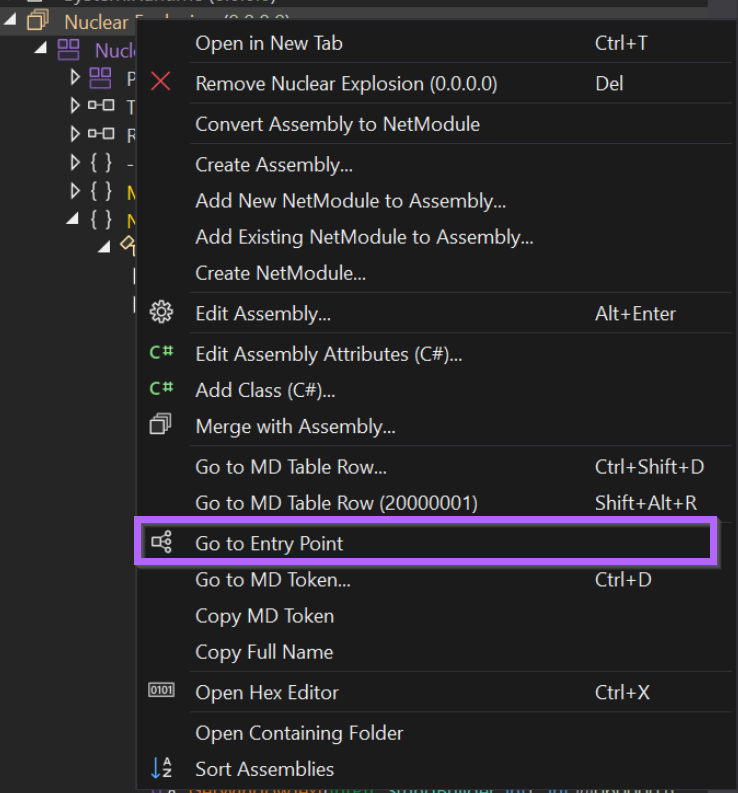
This can be done by clicking on Atomic() in the side menu.
This ensures that the decompiled code is only that of the relevant function.
Now this is where things get interesting.
Switching to IL Instructions
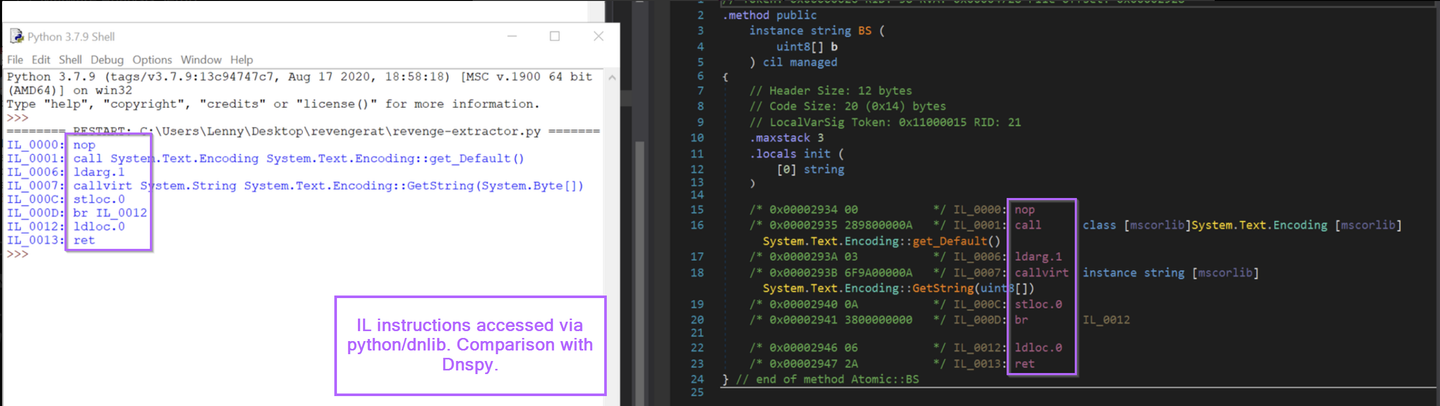
To build configuration extractors for dotnet malware, we generally need to leverage dnlib.
As far as I can tell, dnlib has no knowledge of the decompiled c# code that we see in Dnspy.
Dnlib works best with Intermediate Language (IL) instructions and not decompiled c# code.
To accommodate this, we also need to switch to Intermediate Language Instructions.
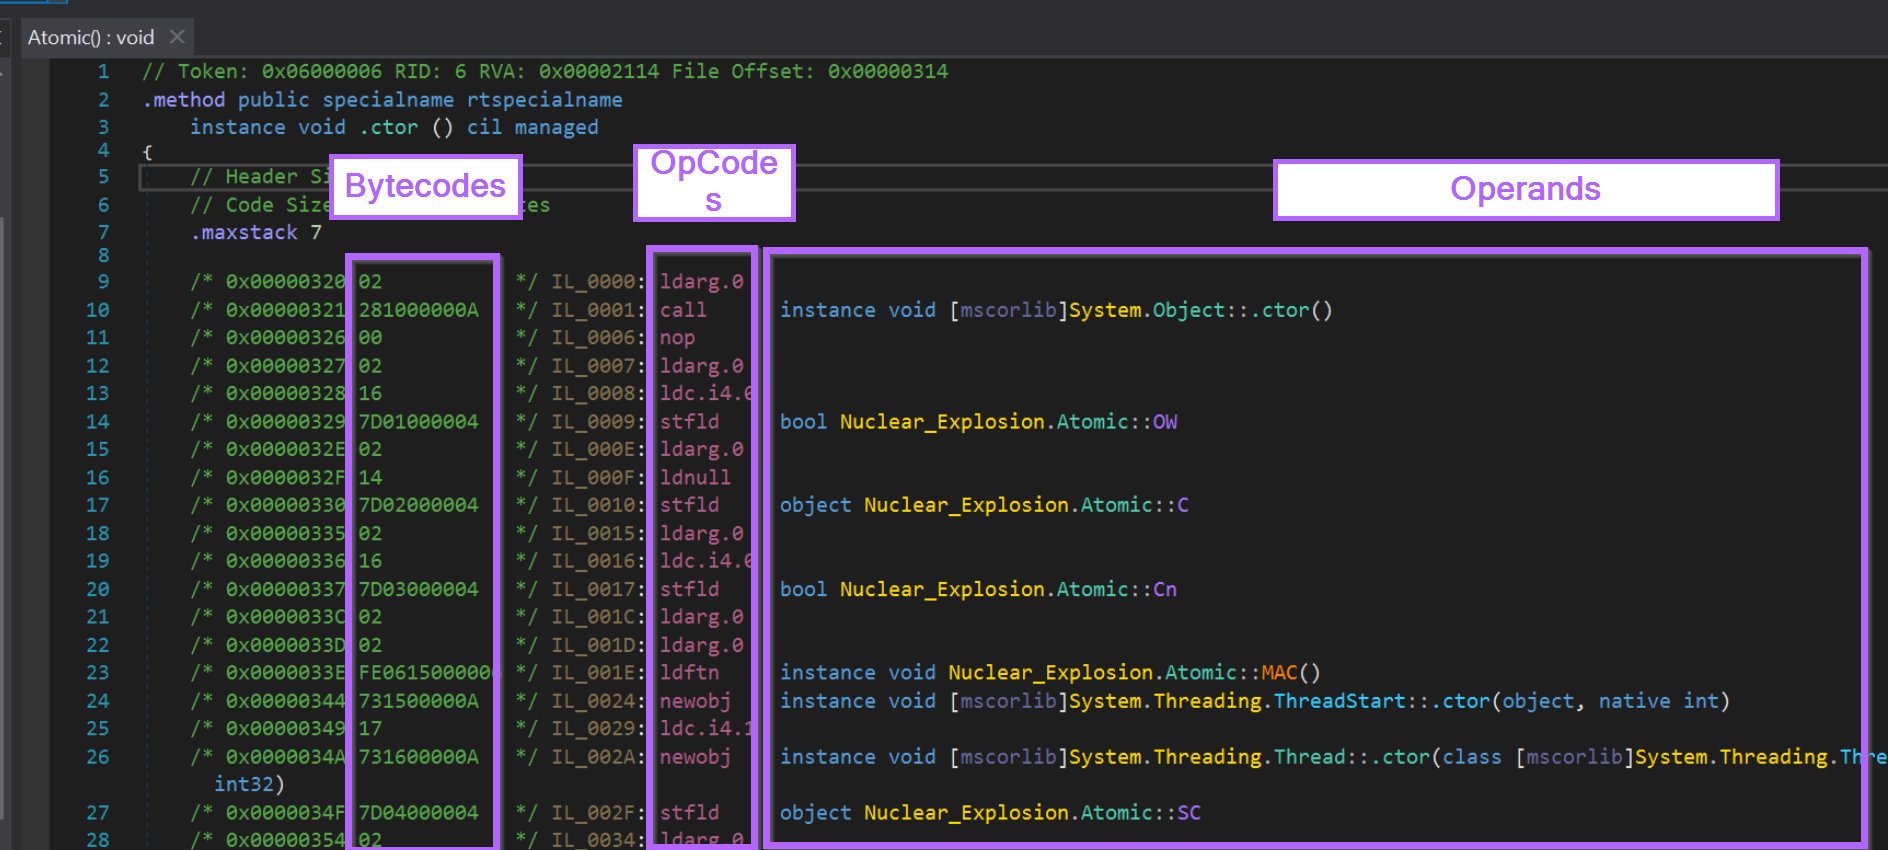
We can do this by changing this dropdown box from C# to IL.

The Atomic() code has now changed significantly. The output now contains Intermediate Language instructions and opcodes instead of the usual c# code.
Everything in this view can be accessed and enumerated via dnlib inside of a python script.

Heres a quick screenshot to better understand the output.
Fun fact - the bytecodes column is extremely useful for developing yara rules targeting dotnet malware. These are the bytecodes that are present in the raw binary. Binary Defense blog
We now want to locate the same configuration values within the IL instructions.
Luckily, they're all still there. Noting that each of the config values are referenced as part of ldstr operations.
ldstr is short for "Load String" and is unsurprisingly used to load strings.
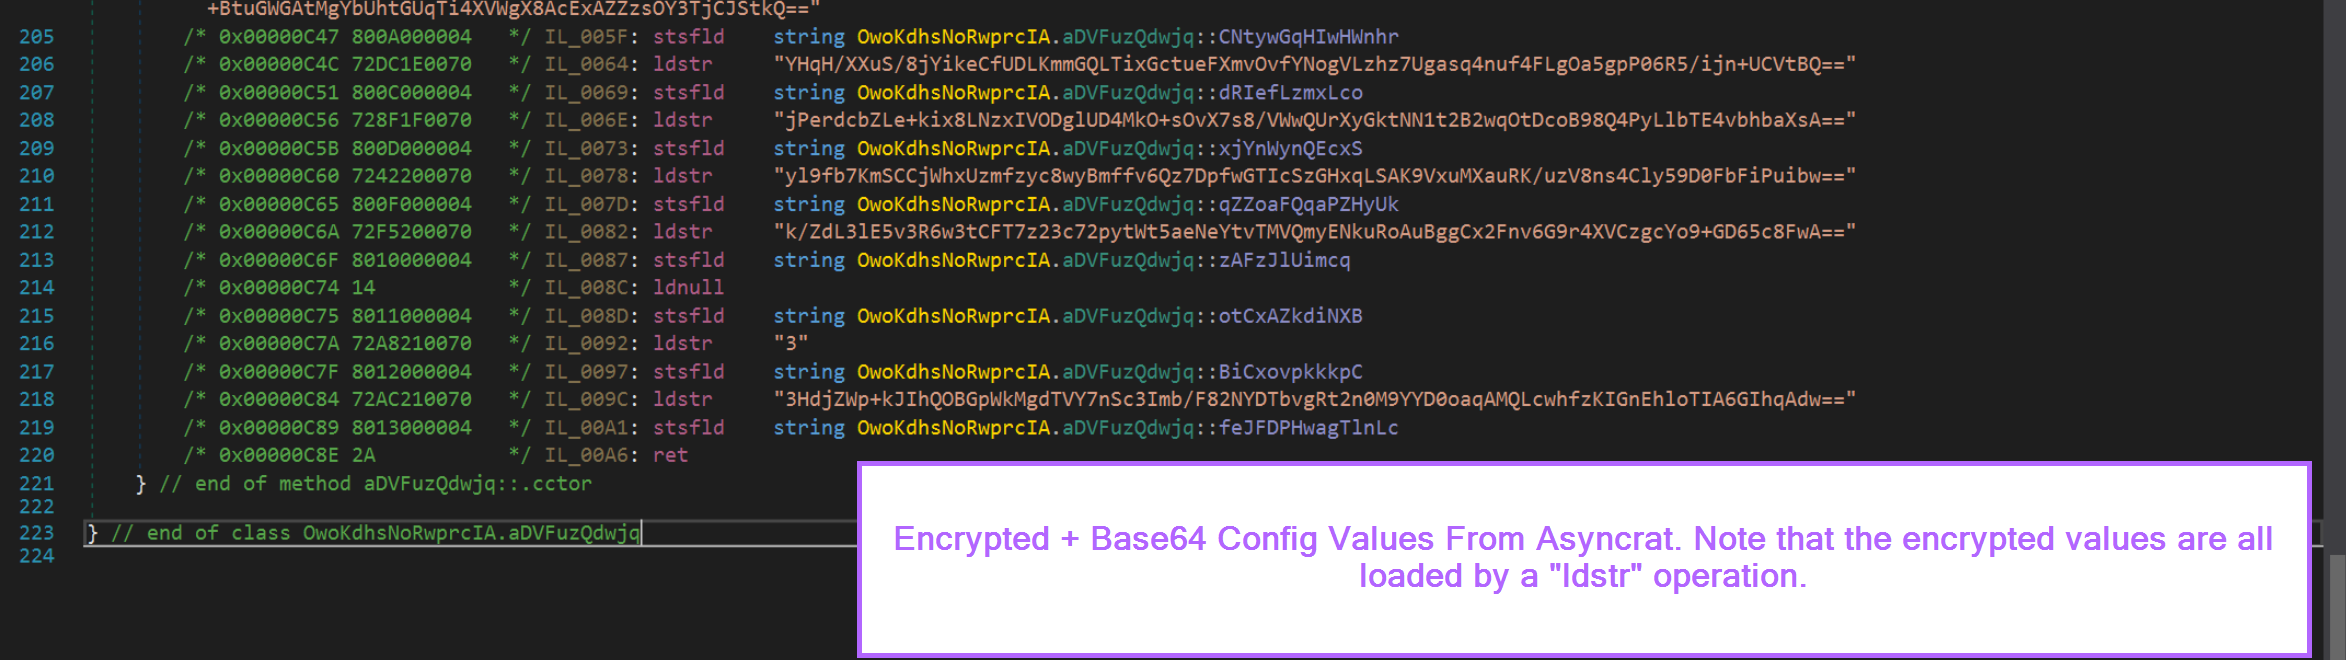
For more complex malware this will look almost exactly the same, with the exception that the strings will be encrypted.
The first step of dealing with more complex malware is locating the encrypted values using an identical process to what we're doing here with RevengeRat.
Below is an Asyncrat sample, where config values are loaded via ldstroperations before undergoing decryption.
Interacting with Dotnet Using Python
Now that we have located the plaintext configuration inside of our file, we want to locate those same values using an automated script.
To do this, we will use Python and the dnlib library.
The following code will load the revenge.bin file into Python using dnlib.
Note that "dnlib.dll" must be inside the same directory as your script.
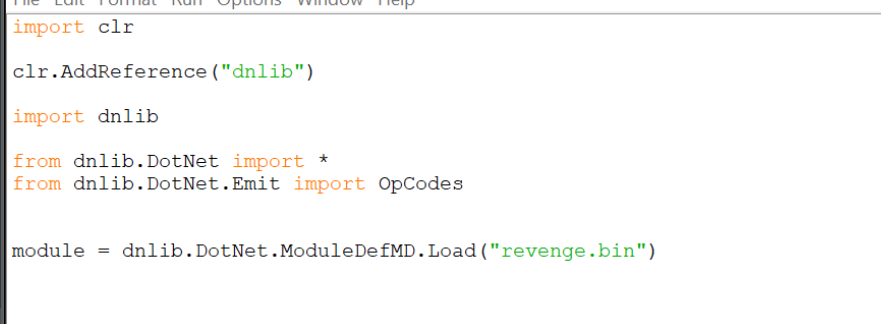
For all future code snippets, I will assume you have the above code at the beginning of your script. This ensures that all the relevant libraries and options are imported.,
With the module now loaded, we can perform some simple operations to replicate our process in Dnspy.
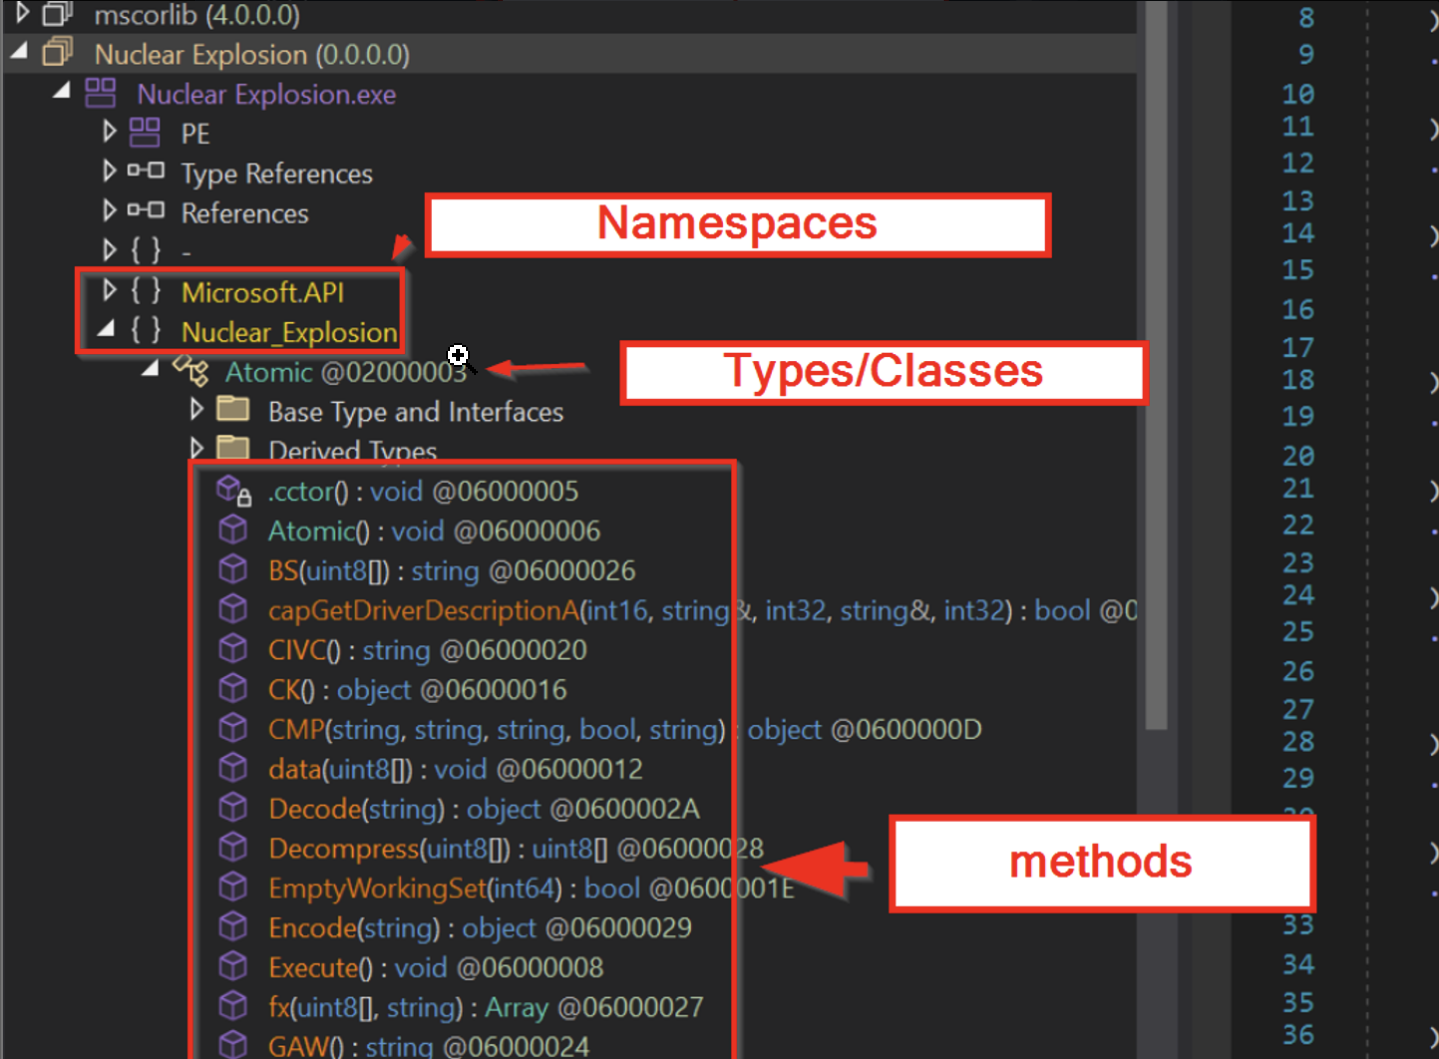
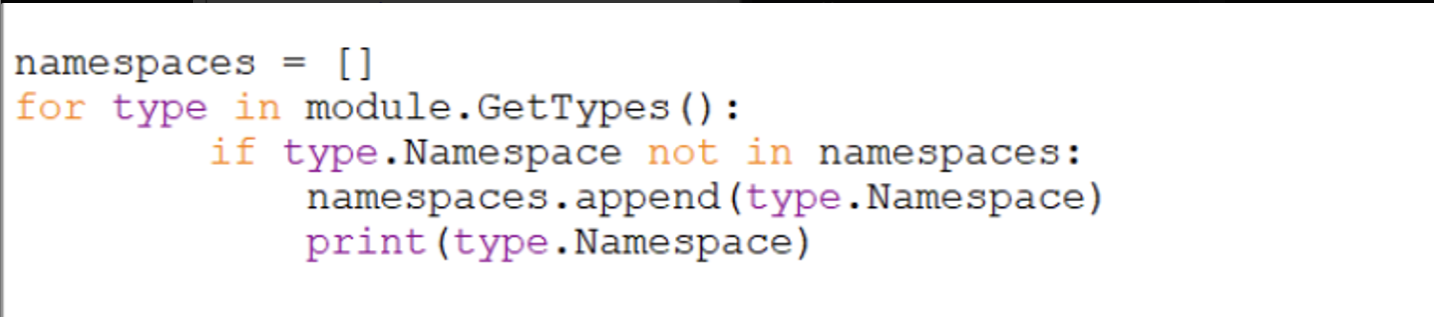
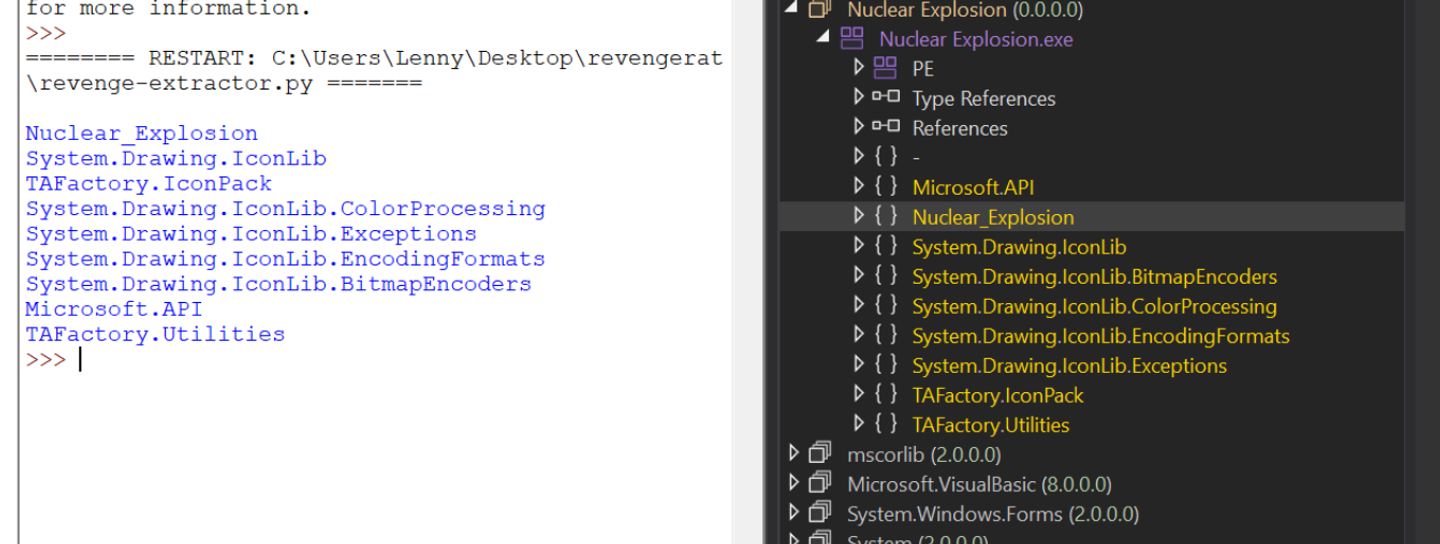
For example, we can list all available namespaces to match that of Dnspy. They aren’t in the same order but you can see that they are all there.
Note that when using dnlib, everything has to be first accessed via it’s associated class/type.
Eg type → namespace ( to obtain a namespace, you must first access a type) or type → method (To obtain a method/function, you must first access a type. )
This is slightly different to how dnspy displays namespace → type → method
for type in module.GetTypes()- this enumerates all types within the malware.if type.Namespace not in namespaces- this is to avoid printing the same namespace twice.namespaces.append(type.Namespace)- adds the namespace to a listprint(type.Namespace)- this prints the namespace
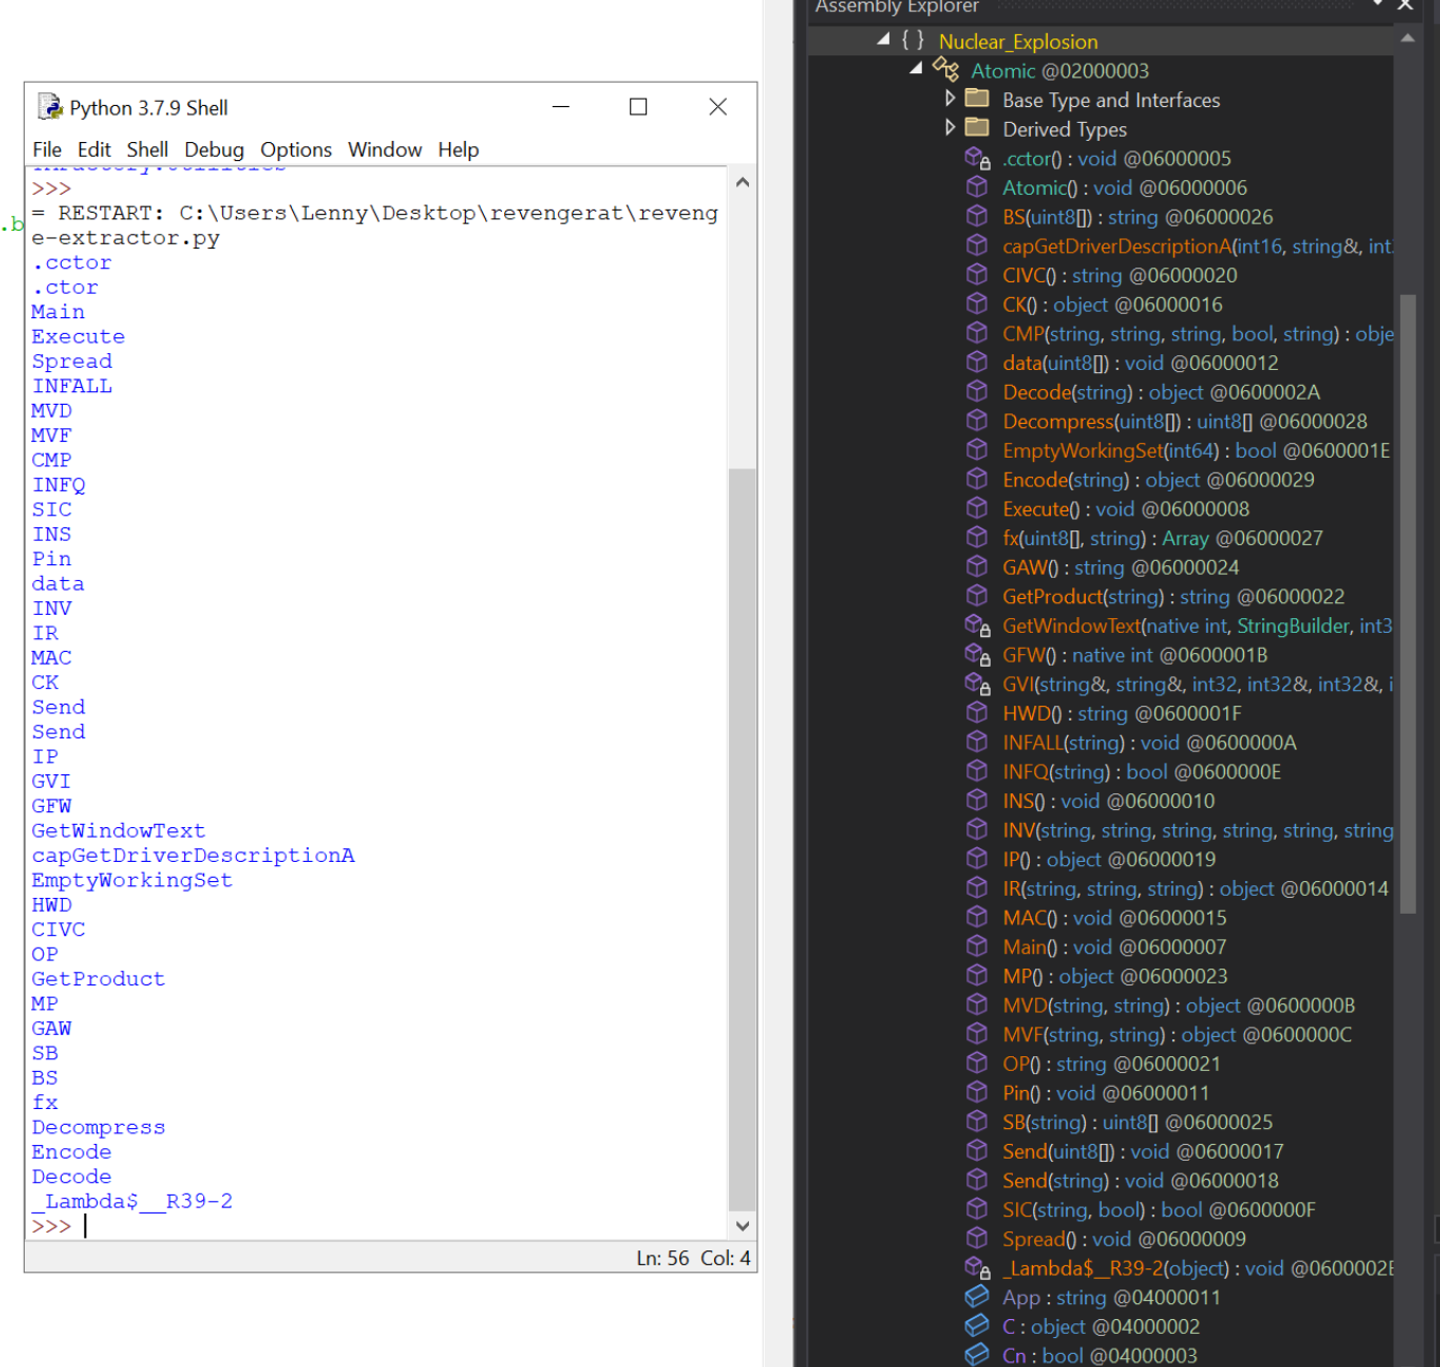
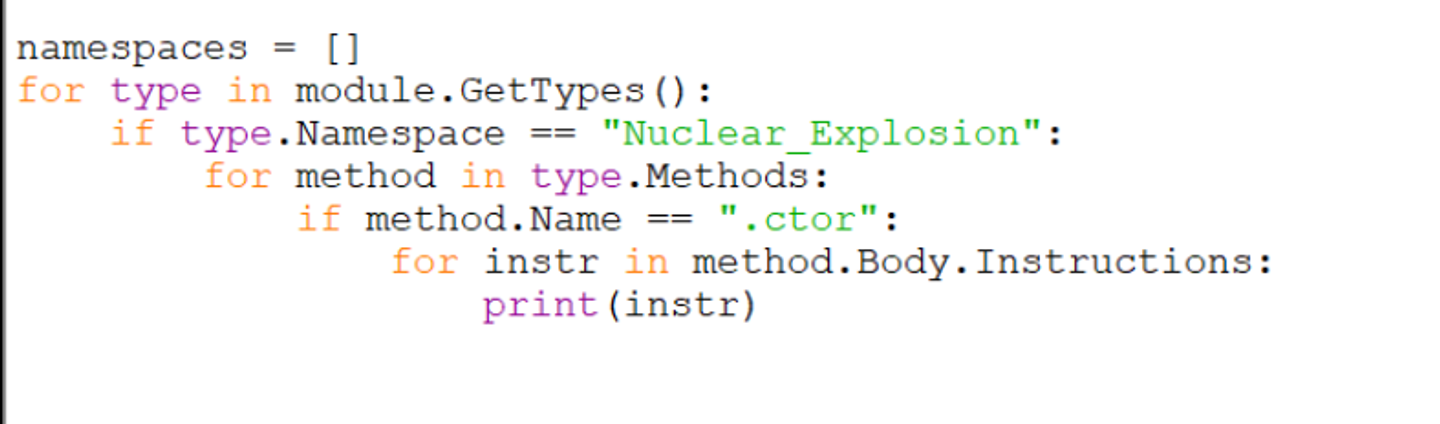
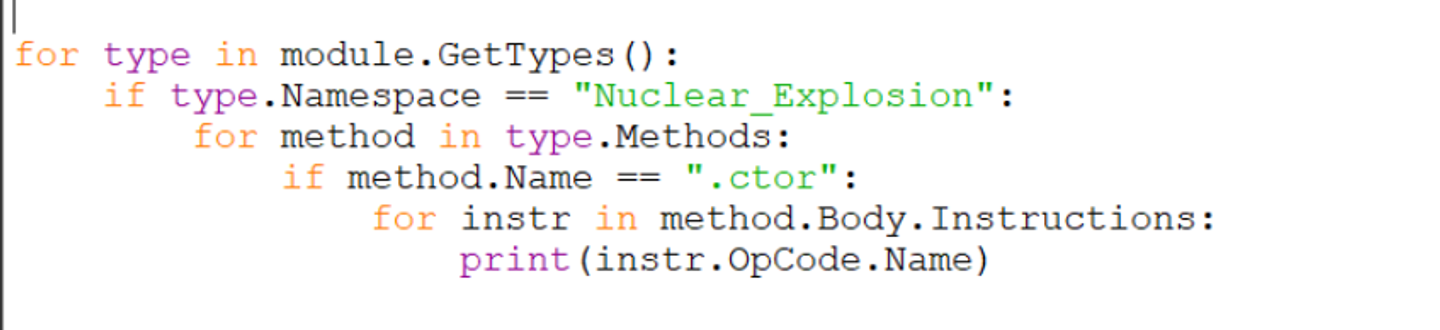
To obtain all available methods in the Nuclear_Explosion namespace, we can do something like this. Note that the types must be referenced first.
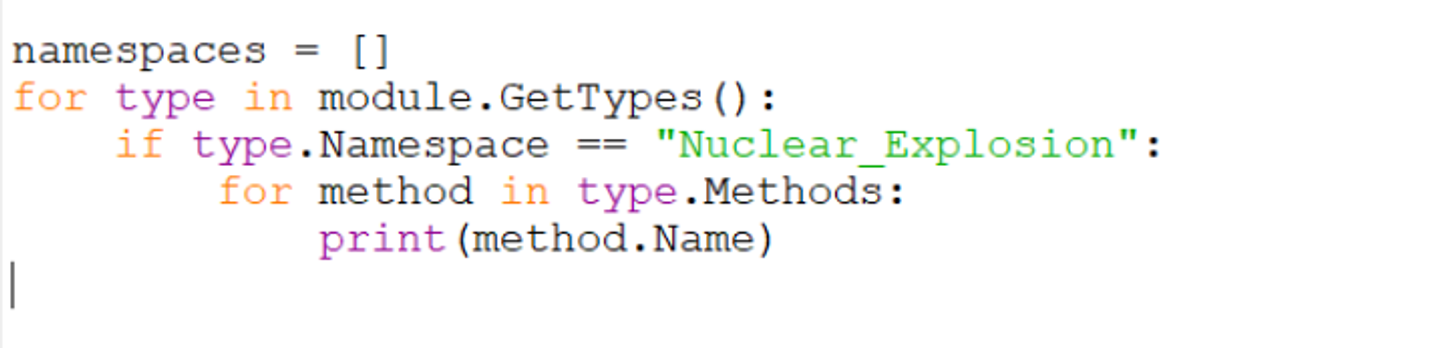
This will display all available methods in the nuclear_explosion namespace. Although they are in a slightly different order by default.Note that since the Atomic() method has the same name as the parent type of Atomic, it is classed as a constructor as is named as .ctor when accessed via dnlib.
This is slightly confusing but something you have to get used to if you haven’t worked with object oriented (c#, java etc) code before.
Accessing IL Instructions
If we hone in on a particular method name, we can obtain the IL instructions just as they were seen in dnspy.
In this case I have chosen the BS method, simply because it’s short and easy to demonstrate the concept.

Below, see how the IL instructions printed via python match those displayed via Dnspy.
Now, we can make it more interesting and do the same with the original Atomic() method that contains the relevant config.
Note that since Atomic() has the same name as the Atomic type/class, it is classified as a constructor which is shortened to .ctor.
If you haven’t worked with object oriented code before, it may be worth googling constructors to get a basic understanding of what they are.
TLDR:
- Constructors are methods/functions that are automatically executed when an object/type/class is created.
- Constructors have the same name as the parent object/type/class.
- Values that require initialization (eg config), are very often found in the constructor for the relevant class/type/object.
For now, just know that the config is inside the .ctor method and you will see this often.
With this knowledge, we can change the previous code to print instructions for the .ctor method.
Using the previous code and updating the method name to .ctor, we can print all of the relevant instructions to match that of Dnspy.
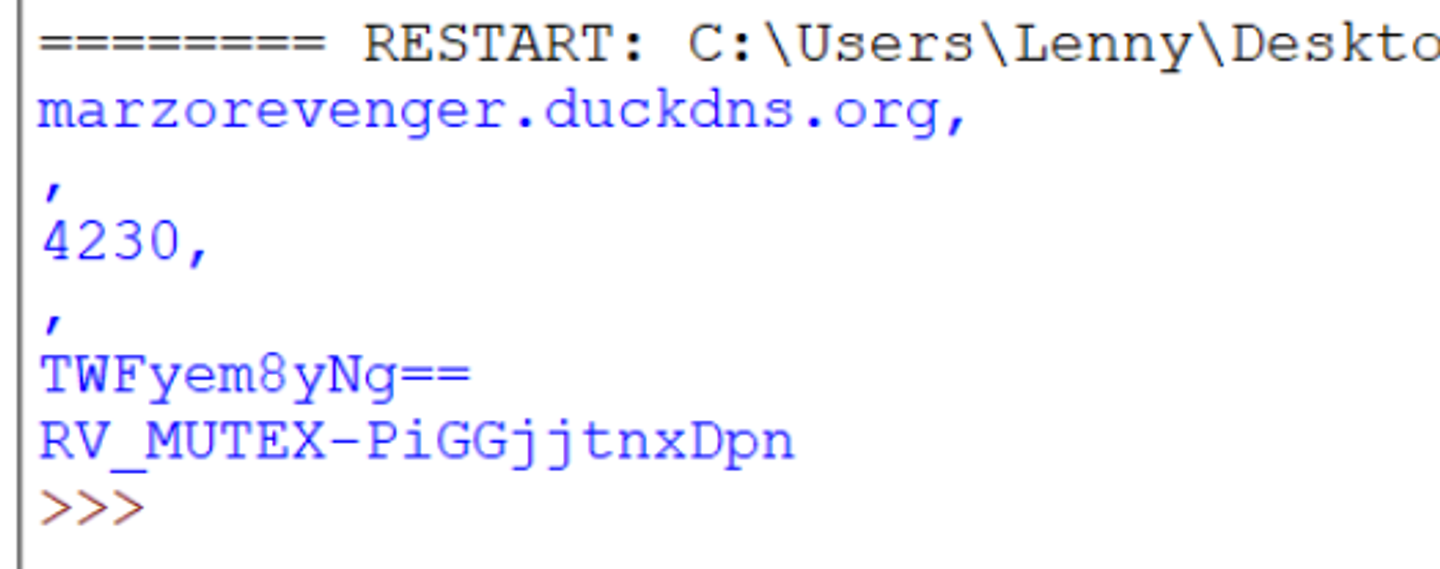
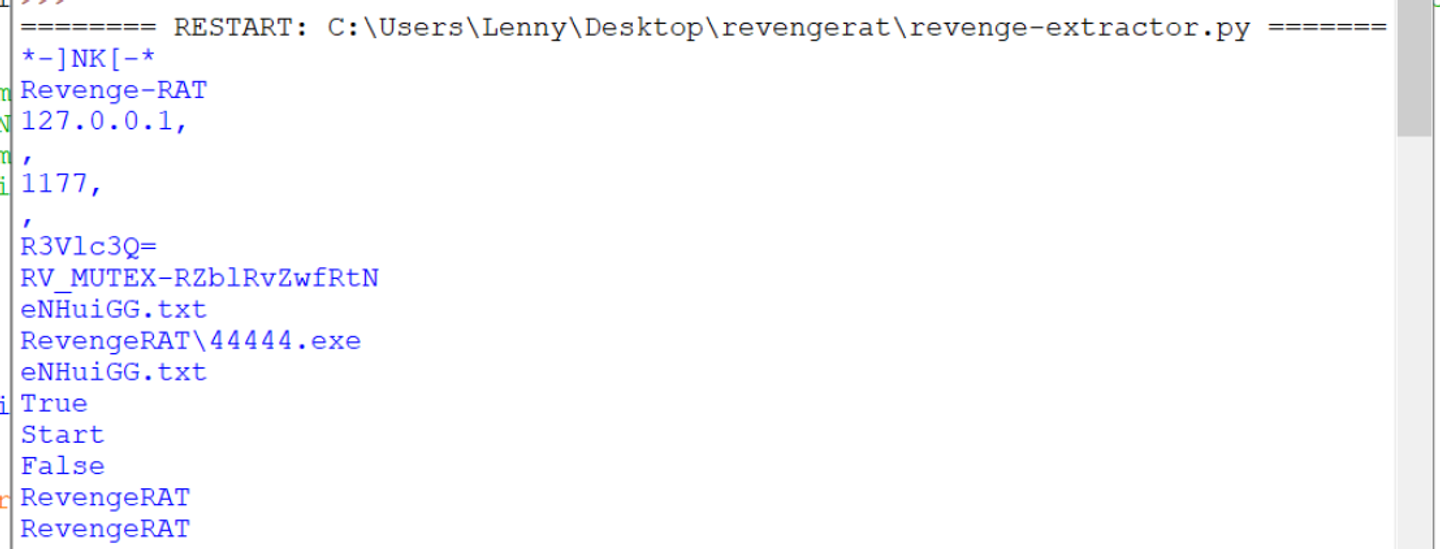
In the printed instructions, we can see the IL instructions containing plaintext config values. The same as can be seen in Dnspy.
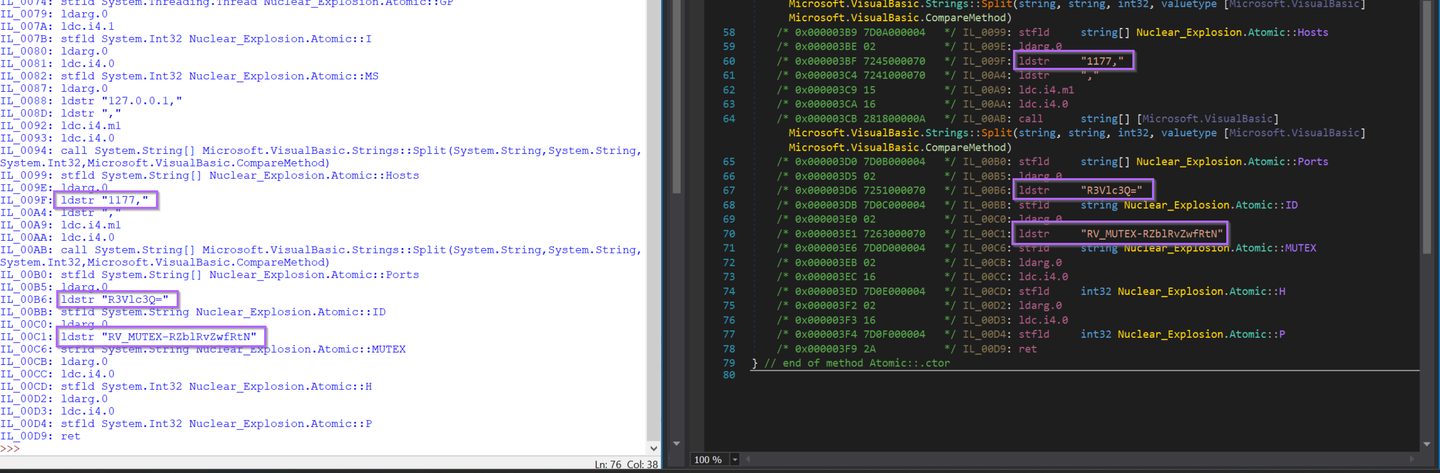
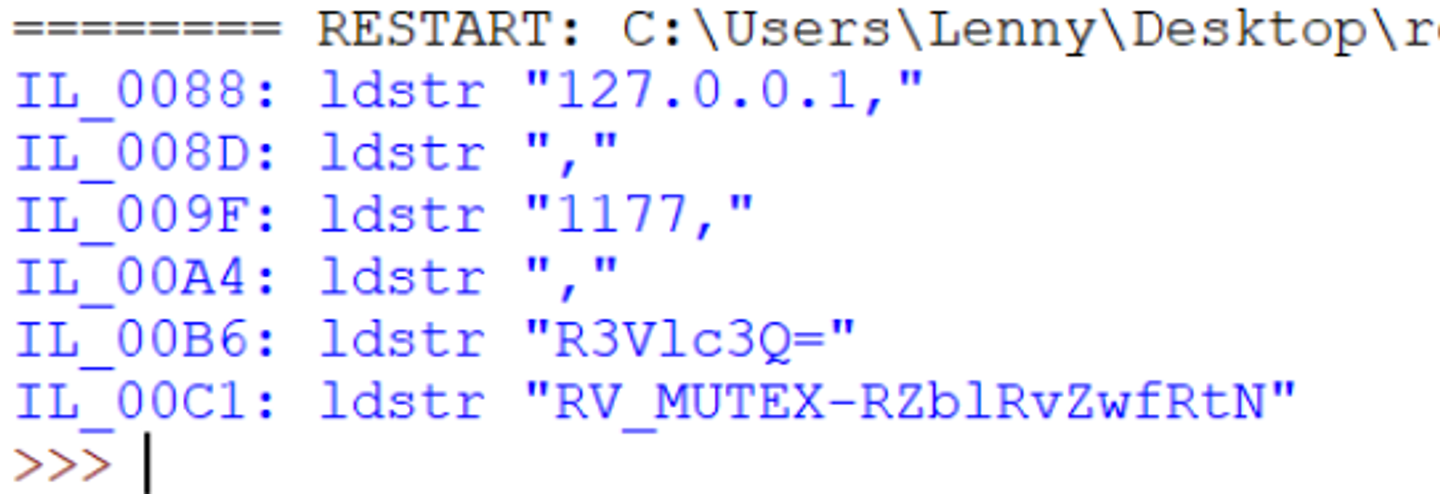
The config values are all referenced via ldstr operations. The script can be modified to only print instructions containing ldstr.
(Make sure you have the line from dnlib.Dotnet.Emit import OpCodes line at the beginning of your script)
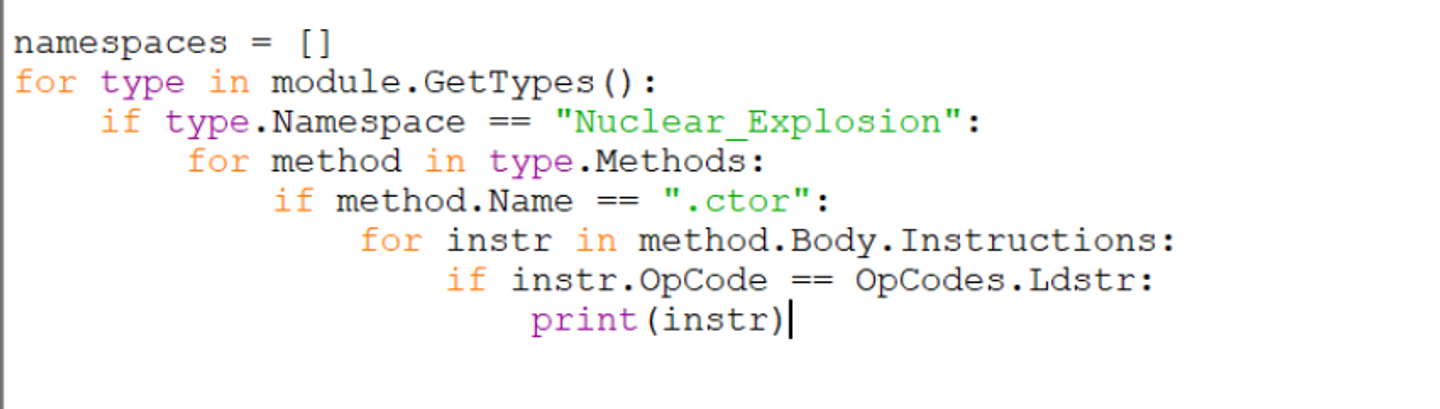
With the additional filtering for ldstr operations, running the script will now output the config related instructions.
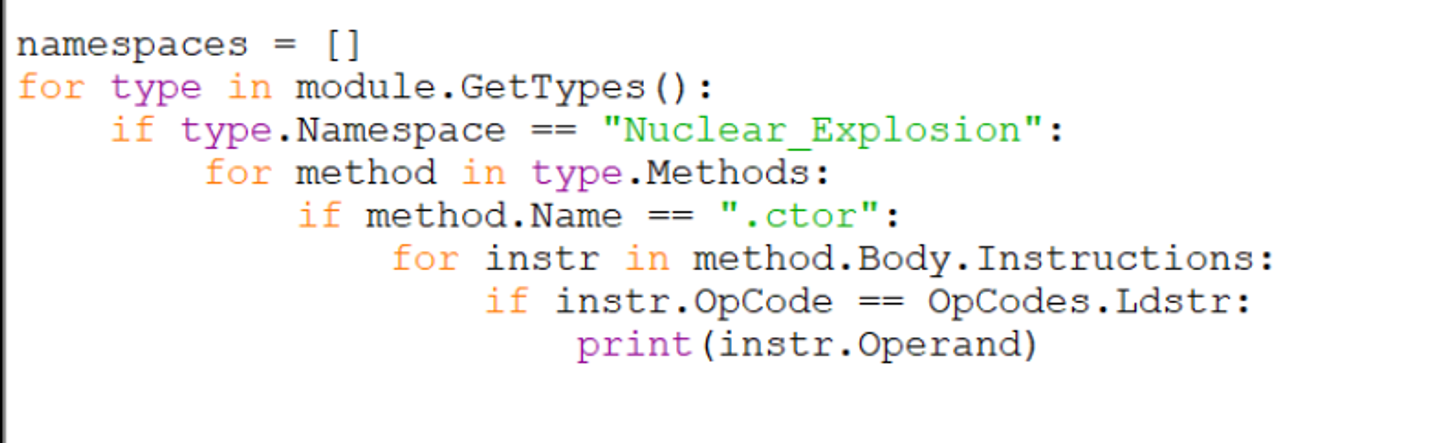
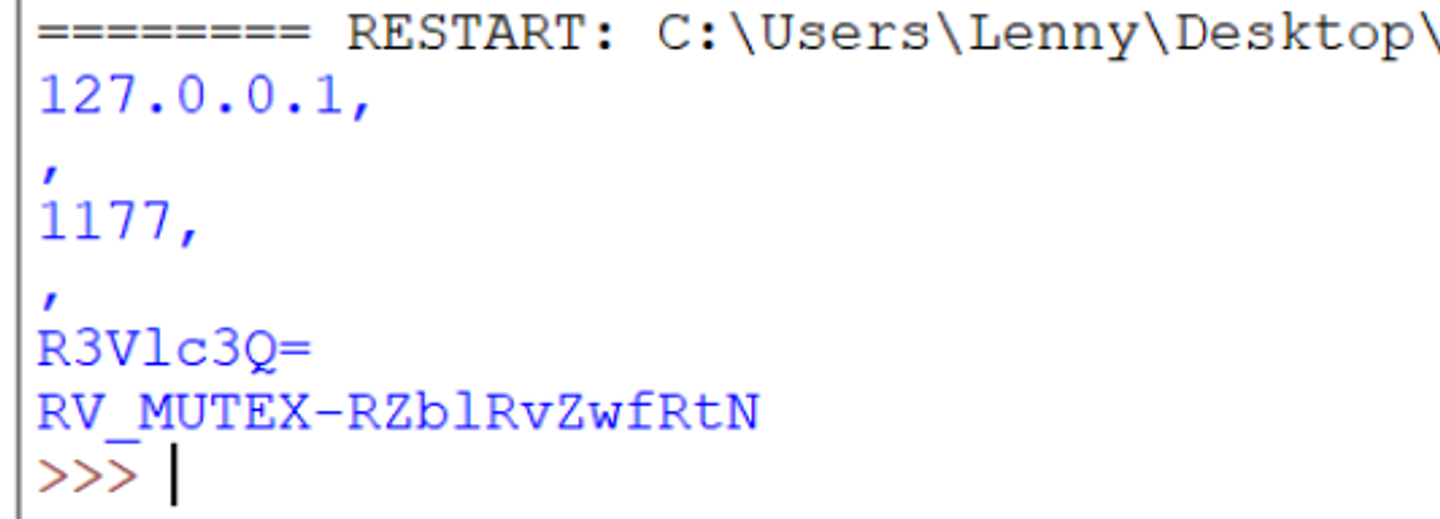
Modifying the final line to print only instr.Operand makes the output even cleaner.
At this point. You can add your own code to provide additional formatting and or adjustments to the values. I won’t really cover that here as the format requirements will be different for everyone.
Testing on additional Samples
From here, you can obtain an additional sample for testing.
In this case, I have used the sample.
2b89a560332bbc135735fe7f04ca44294703f3ae75fdfe8e4fc9906521fd3102
Running the script on the second file produces the following results.
Adding Resilience By Improving Method Signatures.
At this point, you can obtain config values from other samples. But this assumes that the additional samples have not employed any obfuscation and have kept the same method/namespace/class names.
Now there is just one problem, what happens if the malware author decides to modify any of those?
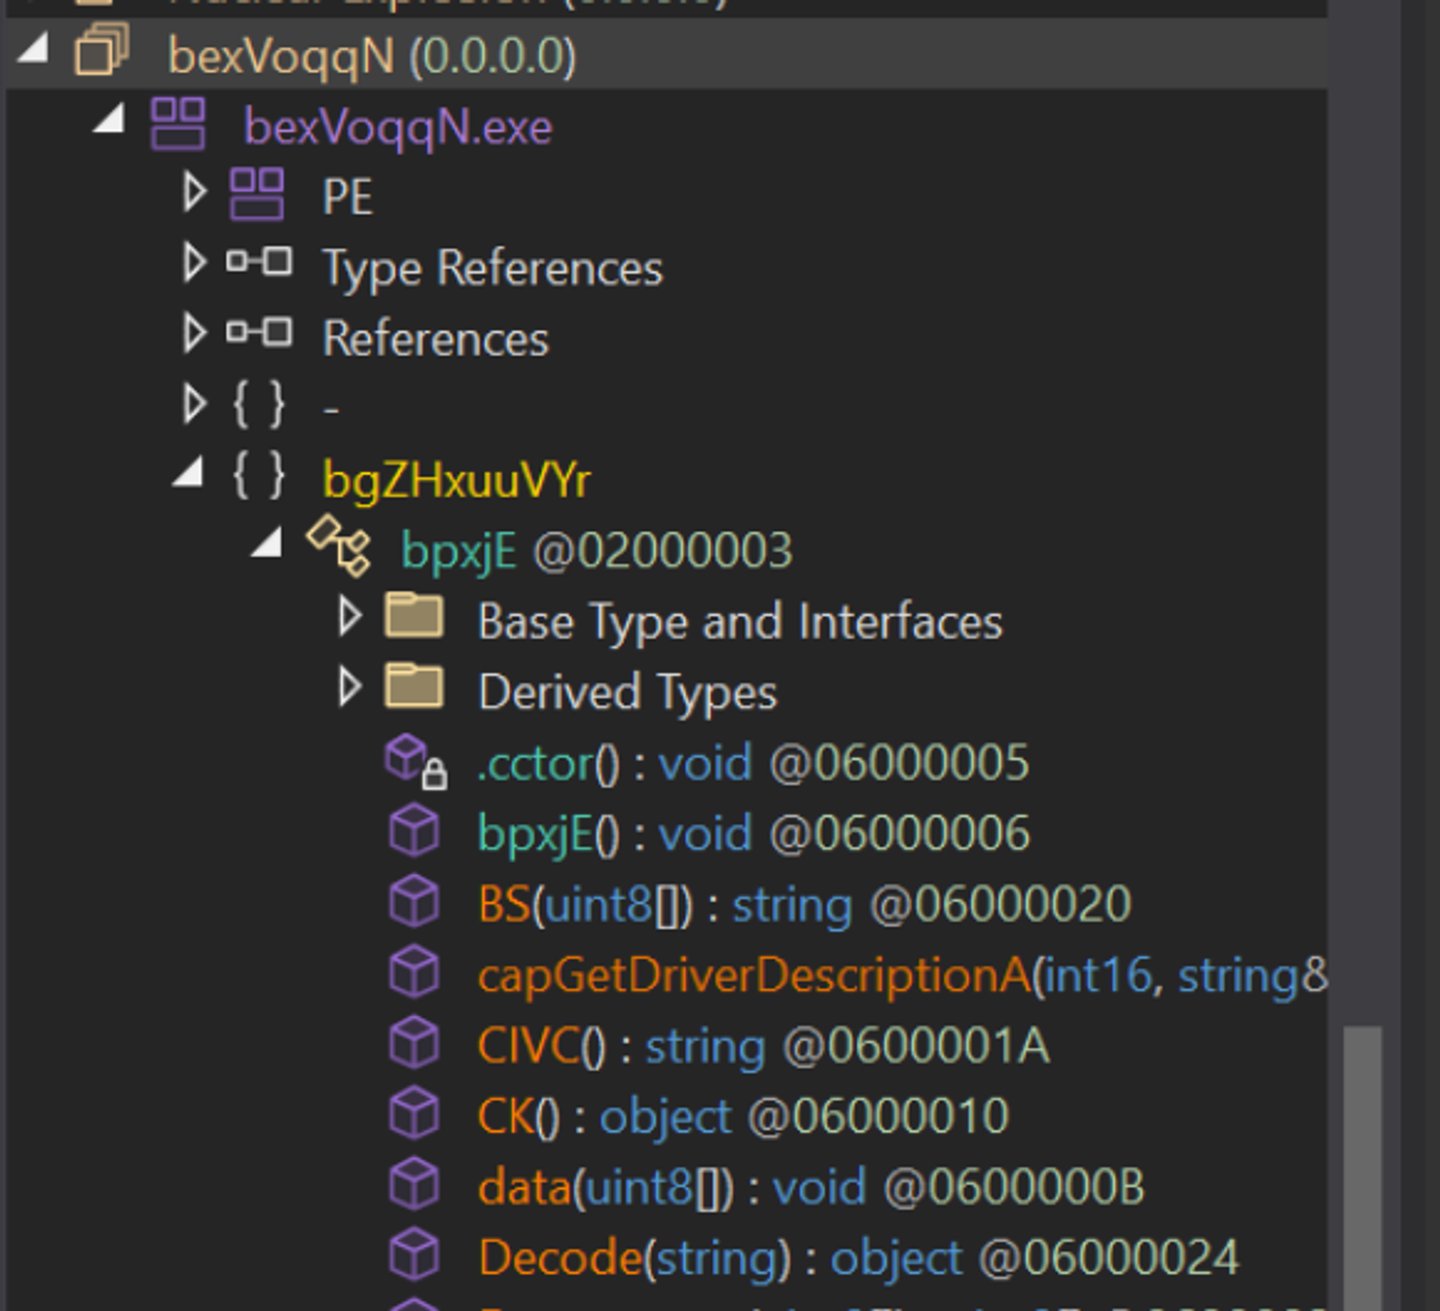
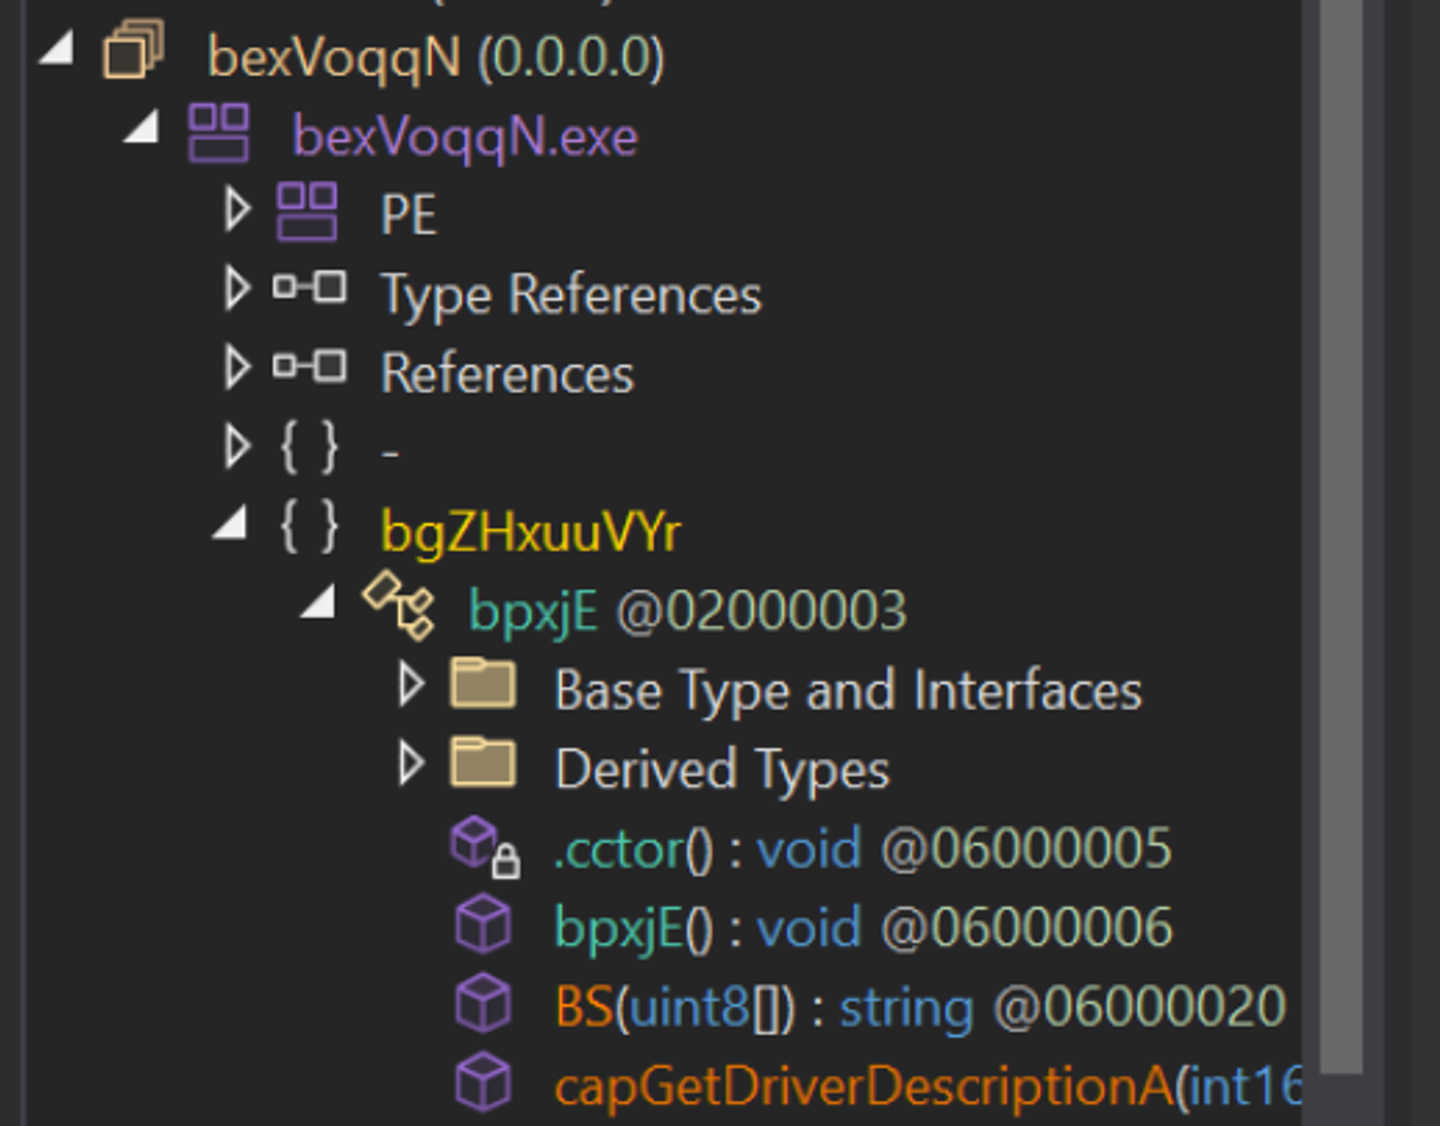
The sample dd203194d0ea8460ac3173e861737a77fa684e5334503867e91a70acc7f73195 introduces this exact problem.
This sample uses largely the same structure as before, but uses randomized namespace and type names.
This breaks our original script as there is no Nuclear_Explosion namespace or Atomic class to signature from.
Running the script on the new sample produces no results.

We can see below that the code is largely the same, but the method and class names are different.
There are some similarities in other method names, (data, decode, BS etc) but these could be easily changed as well so we will avoid using this as part of a signature.
For the most resilient approach, we will instead use the IL operations.
(There are other signature opportunities, but they will not be covered in this post)
See below, the obfuscated sample and the original sample contain the same IL instructions for loading config values.

If we implement the following code. We can enumerate all available types and methods in the obfuscated sample, printing all values contained in ldstr operations.
has_config_pattern(method)- a (currently) empty function for enumerating configuration patterns.method.HasBody- this ensures that empty methods/functions are skipped.
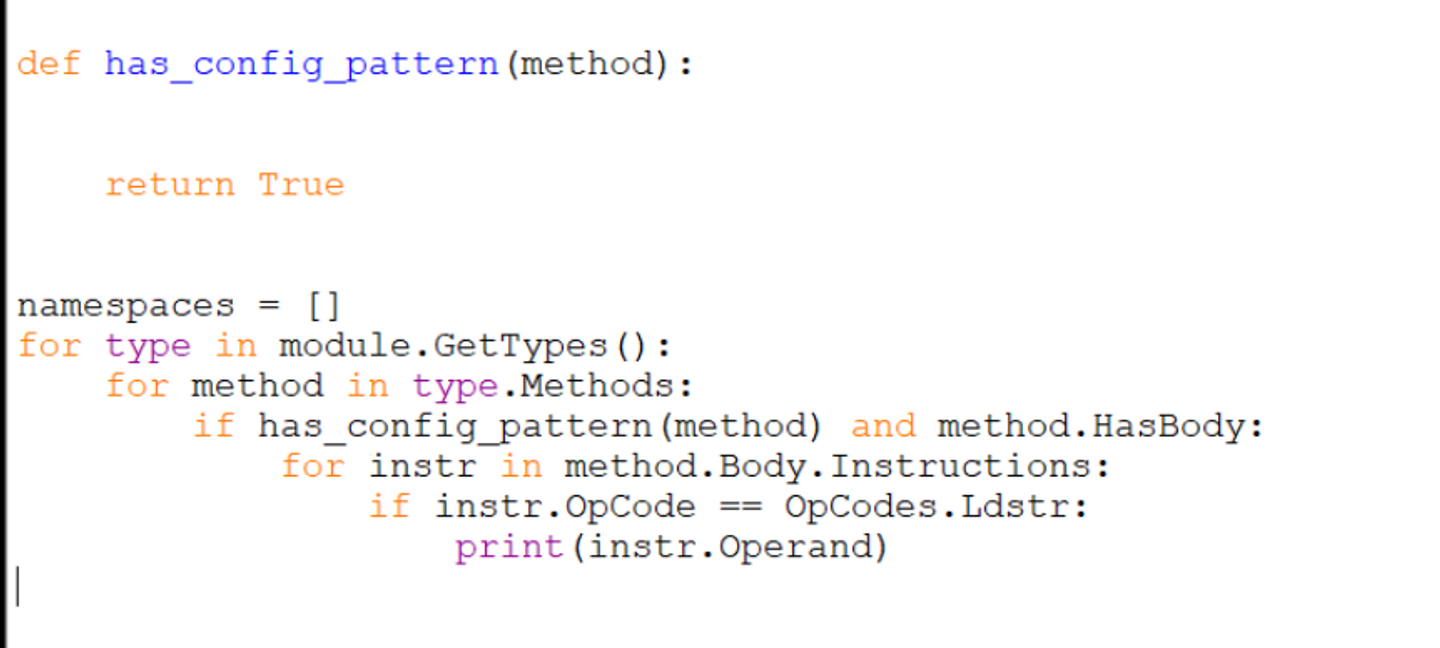
This script will enumerate all ldstr operations within the obfuscated file and print the loaded value.
Technically, this prints the config values, but it also prints 269 other string values which are not useful. So we want to improve the has_config_pattern function to hone in only on the methods containing relevant IL instructions.
(Note that I am using the initial file here for readability)
Let’s modify the has_config_pattern function to filter on matching IL instructions.
For this example, I will use the last 14 instructions of the Atomic function. You can use more or less, experiment to see what works best for you.

I will re-use one of the previous code snippets, which prints the .ctor IL instructions related to Nuclear_Explosion.
This prints a long list of instructions, but as mentioned, I will be using the last 14 for my signature.

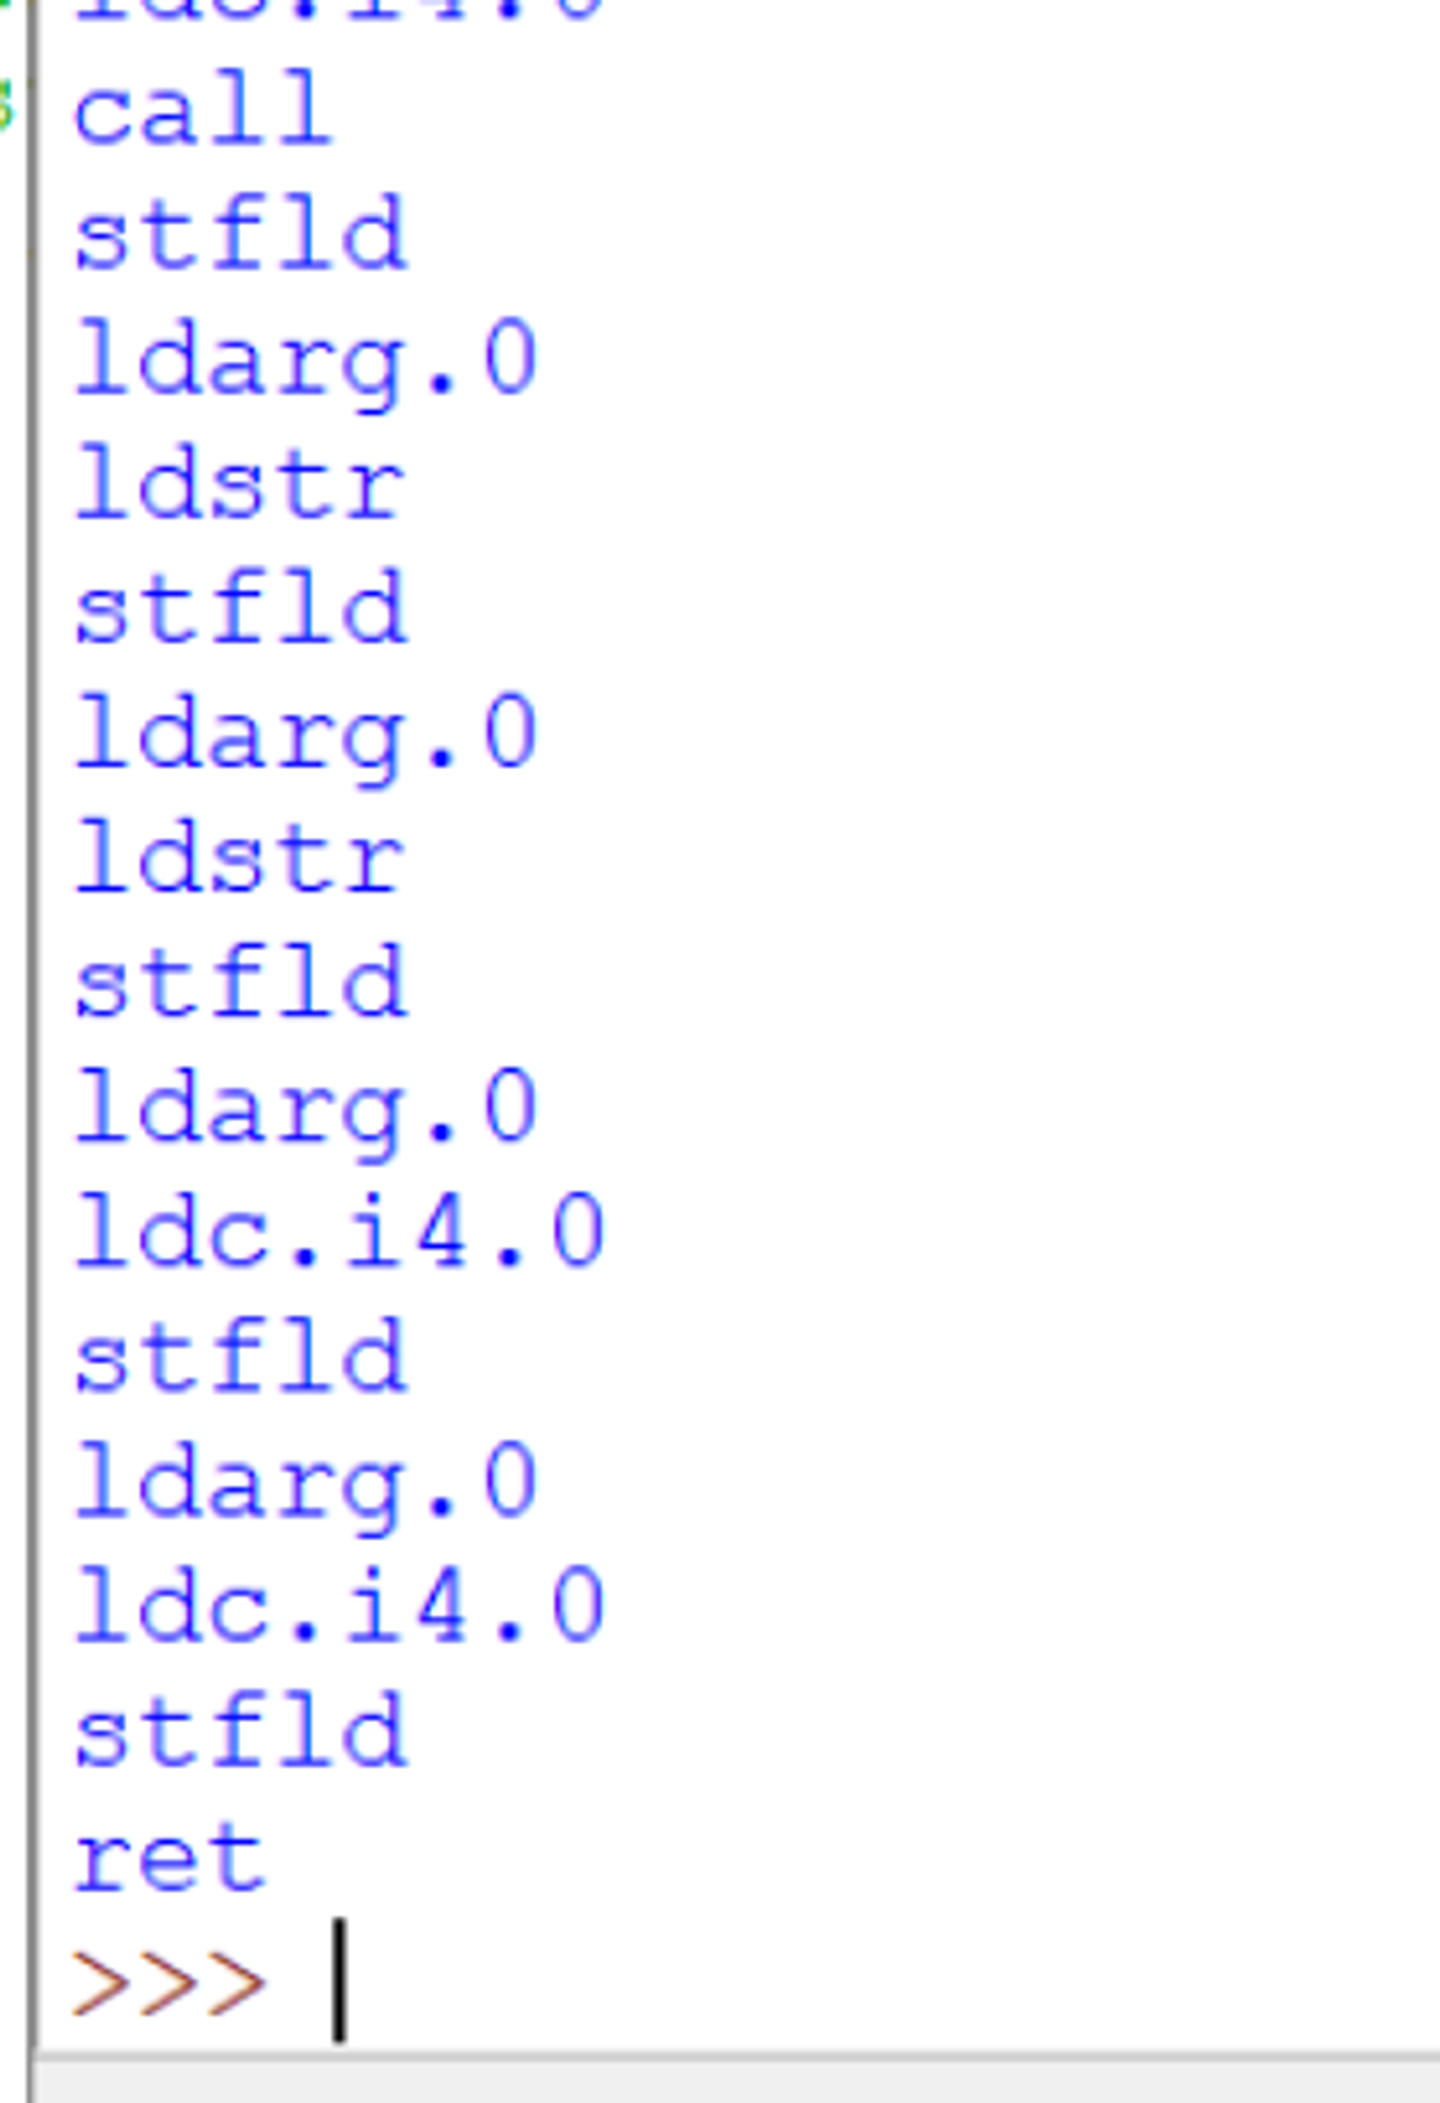
To generate a signature, we can copy out the values and create a string array like this.

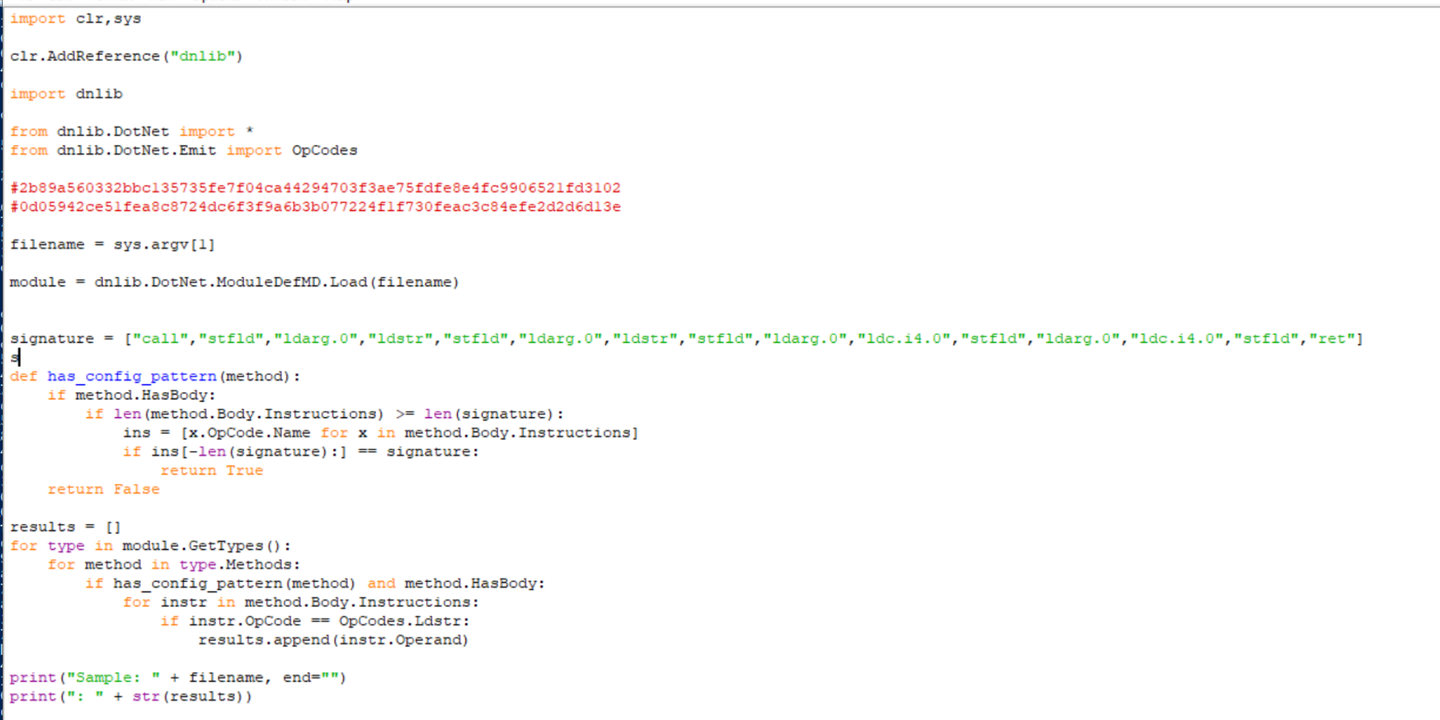
The entire code now looks like this.
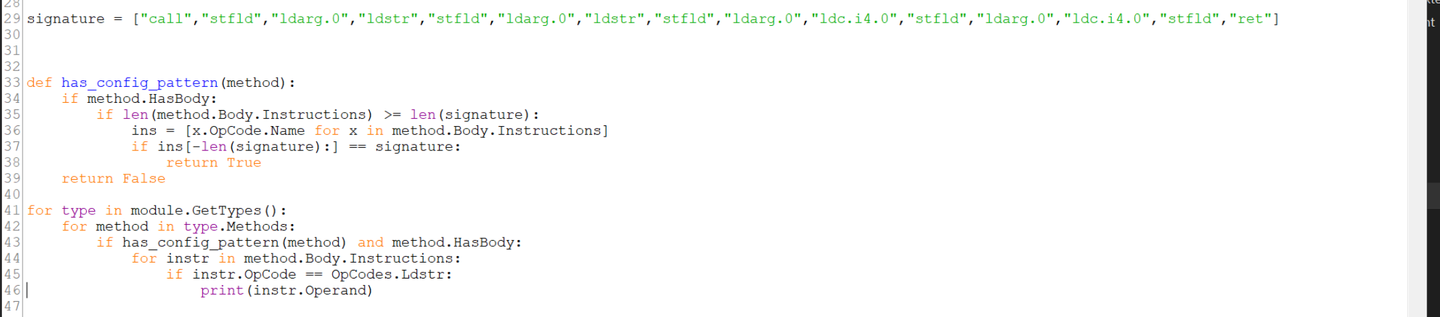
and the signature checking code has_config_pattern now looks like this.
method.HasBody- this is a filter to ensure the checked method is not emptyif len(method.Body.Instructions) >= len(signature)- this is a filter to ensure the checked method is at least as long as the signature.ins = [x.OpCode.Name for x in method.Body.Instructions]- this creates an array of instructions for method being checked.[x.OpCode.Name](<http://x.OpCode.Name>)- this obtains only the instruction opcode name, which produces an array that looks like our signature array.if ins[-len(signature:] == signature- we only want to check the last instructions against our signature. if our signature is 14 instructions, we only want to check the last 14 instructions against our signature.
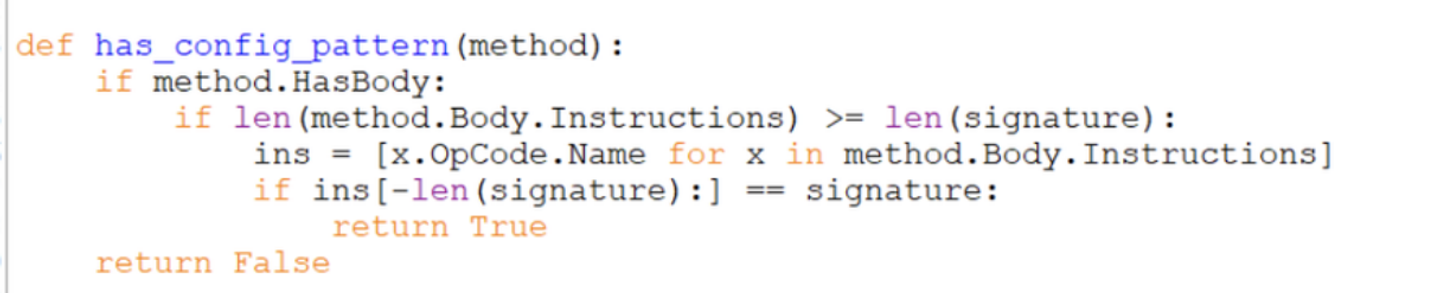
This is the most important piece of the has_config_pattern function. Which compares the final instructions against our signature.

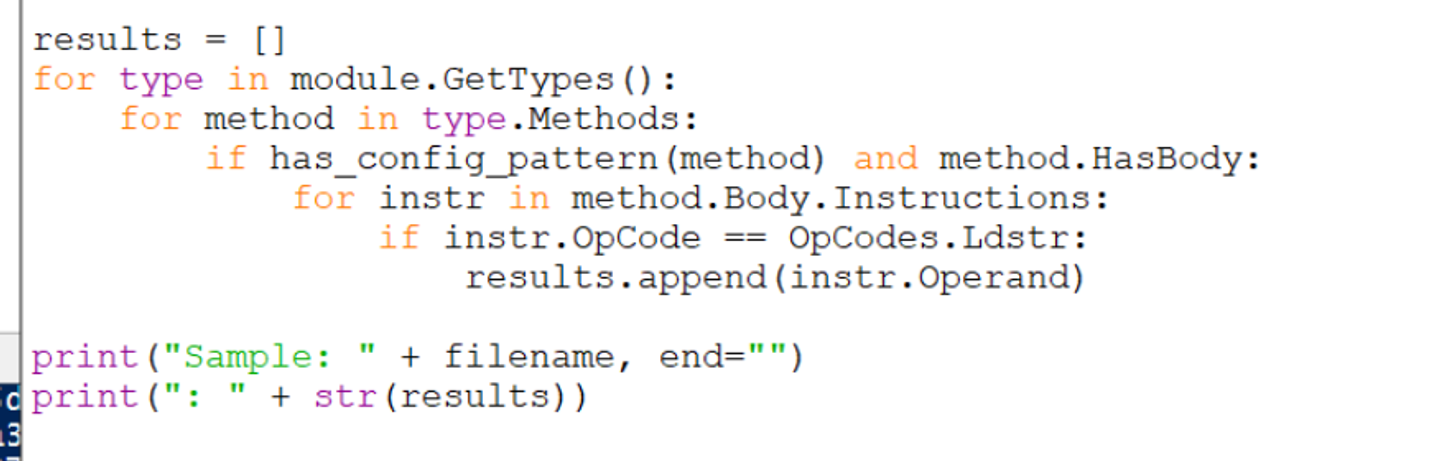
With the new signature added, we can remove the .ctor and nuclear_explosion check and re run against our original sample.
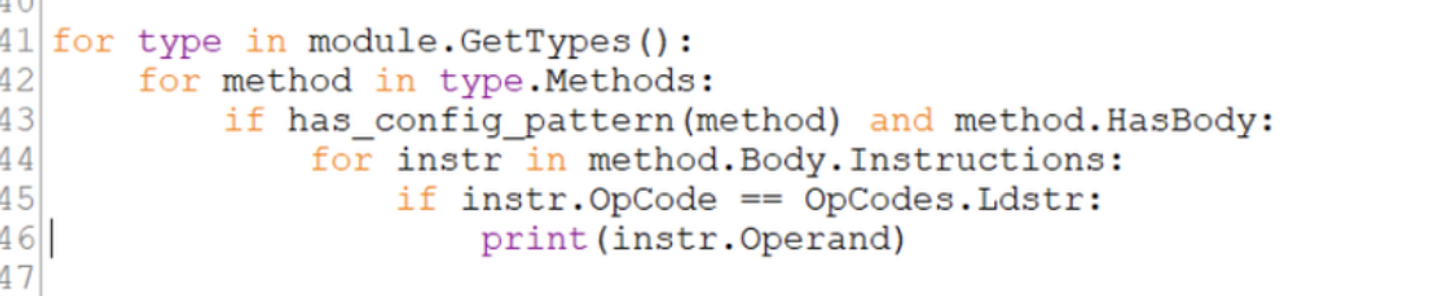
The config is found exactly as before. Despite the name signatures being removed. Only the IL instructions are used to locate the config values.
Running Against The Obfuscated Sample.
Running the new code against the obfuscated sample dd203194d0ea8460ac3173e861737a77fa684e5334503867e91a70acc7f73195. The config values are able to be obtained.
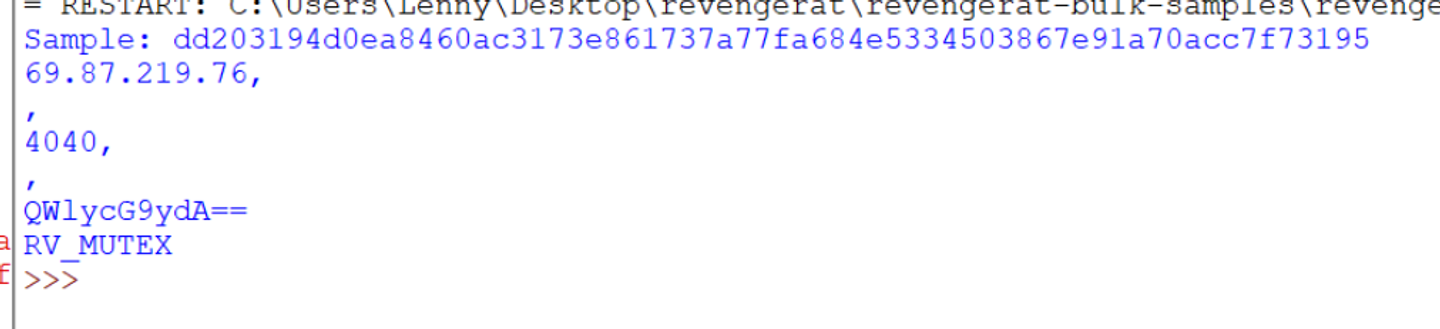
The configuration values are able to be extracted from both. Regardless of the fact that the method and class names are different between samples.
This is due to the identical opcode instructions between the two samples.

Implementing a Bulk Extractor
By very slightly modifying the script to take a filename as argument sys.argv[1] , we can implement a bulk extractor for many files.
For bulk extraction, the final code has been modified to print everything on a single line. As well as printing the filename.
This produces a slightly cleaner output for an individual file.

Now, if we can obtain a set of samples (I used unpacme).
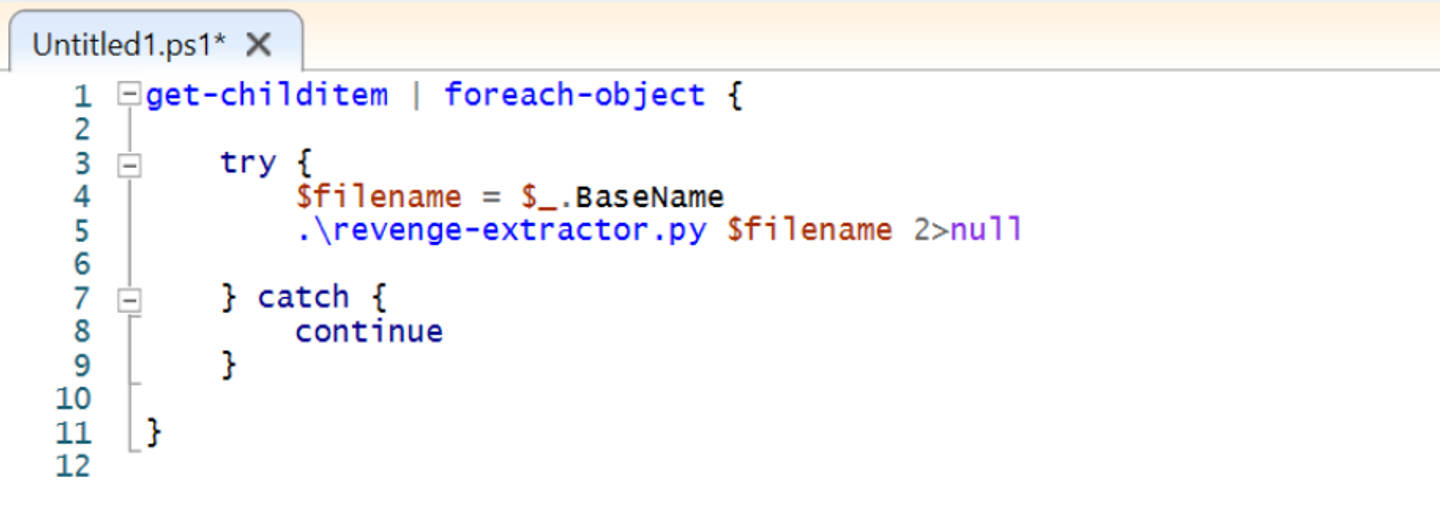
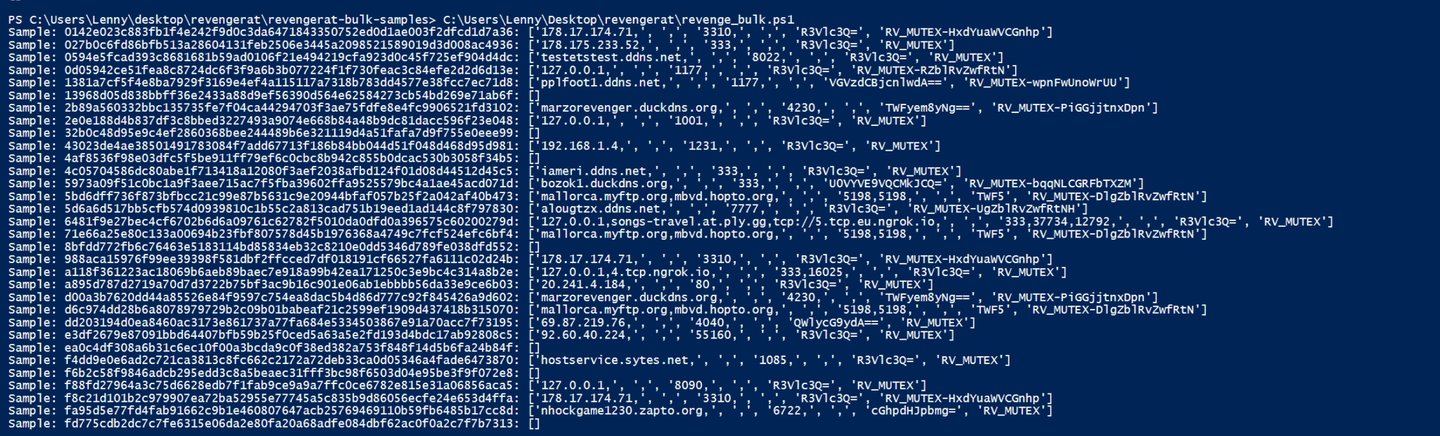
We can combine this with a short powershell script for bulk config extraction.
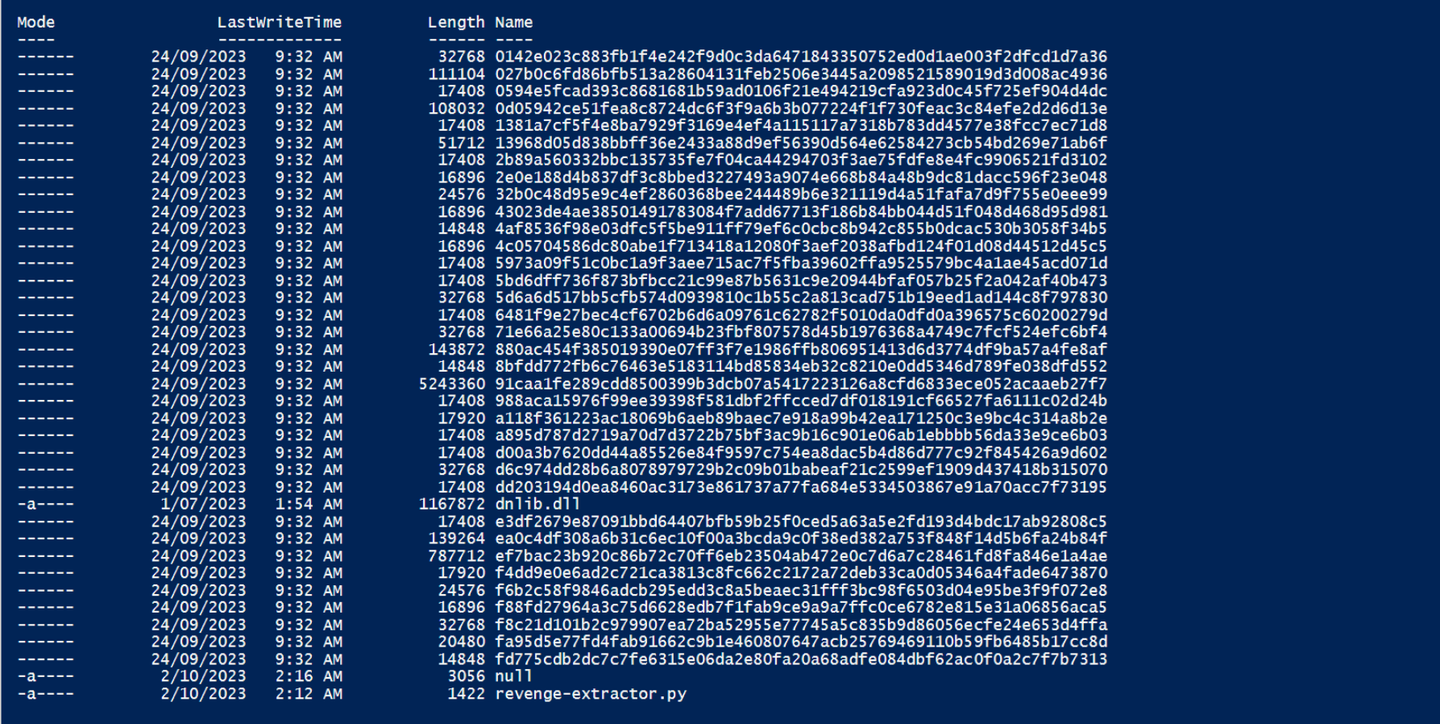
This particular script has been placed in a folder with lots of RevengeRat Samples.
The sample folder is shown below
Running the powershell script, produces the following results. There are some failures but the extractor mostly works. The failures are due to slightly differing patterns in some obfuscated samples. This is something that will be covered in a future post.
Conclusion and Final Takeaways
In this post, we have covered the basics of extracting configuration from a very basic dotnet malware sample. The techniques covered here form the basis of configuration extraction for most dotnet malware. Advanced samples will not store values in plaintext, but encrypted values will typically be stored in a very similar way via ldstr operations.
The initial steps (prior to decryption) for advanced samples will be the same as seen here today.
If you found any of this useful, consider signing up to the site. Signed up members will receive access to a discord server, bonus content and early access to future posts.
Sign up for Embee Research
Malware Analysis Insights
No spam. Unsubscribe anytime.
References
A collection of blogs and scripts that have helped me learn these concepts.
- RussianPanda - https://russianpanda.com/2023/07/04/WhiteSnake-Stealer-Malware-Analysis/
- N1ghtw0lf - https://n1ght-w0lf.github.io/tutorials/dotnet-string-decryptor/
- Polish Cert - https://cert.pl/en/posts/2023/09/unpacking-whats-packed-dotrunpex/
- OALabs Research - https://research.openanalysis.net/dotnet/static analysis/stormkitty/dnlib/python/research/2021/07/14/dot_net_static_analysis.html
Full Script
"""

Revenge Rat Config Extractor Example
@embee_research

Samples
2b89a560332bbc135735fe7f04ca44294703f3ae75fdfe8e4fc9906521fd3102
0d05942ce51fea8c8724dc6f3f9a6b3b077224f1f730feac3c84efe2d2d6d13e

"""


import clr,sys

clr.AddReference("dnlib")

import dnlib

from dnlib.DotNet import *
from dnlib.DotNet.Emit import OpCodes


filename = sys.argv[1]


module = dnlib.DotNet.ModuleDefMD.Load(filename)

signature = ["call","stfld","ldarg.0","ldstr","stfld","ldarg.0","ldstr","stfld","ldarg.0","ldc.i4.0","stfld","ldarg.0","ldc.i4.0","stfld","ret"]

def has_config_pattern(method):
    if method.HasBody:
        if len(method.Body.Instructions) >= len(signature):
            ins = [x.OpCode.Name for x in method.Body.Instructions]
            if ins[-len(signature):] == signature:
                return True
    return False

results = []
for type in module.GetTypes():
    for method in type.Methods:
        if has_config_pattern(method) and method.HasBody:
            for instr in method.Body.Instructions:
                if instr.OpCode == OpCodes.Ldstr:
                    results.append(instr.Operand)

print("Sample: " + filename, end="")
print(": " + str(results))